Difference between revisions of "Creating a Prescription"
From Optisoft
| (27 intermediate revisions by the same user not shown) | |||
| Line 1: | Line 1: | ||
| − | + | __TOC__ | |
| − | + | ||
| − | |||
==Adding a Spectacle Prescription== | ==Adding a Spectacle Prescription== | ||
| − | + | In order to add a Spectacle Prescription to a Record, follow the below instruction. | |
| − | + | <center>[[image:PatientsSpecsRx2022.png|border|900px|Spectacle Prescription]]</center> | |
| − | *Select Add | + | *You will first need to find a patient record. |
| − | *You will now be able to enter the Date | + | *Select Add New Prescription from the Prescription tab located at the bottom of the Record screen. |
| − | *The Rx details can then be entered by either using the drop down lists, or by manually typing into the relevant text boxes. | + | *You will now be able to enter the Date, the Optician that provided the Rx and a brief Description. Should the Rx have been given elsewhere, the Walk-In option allows you to specify this. You can also specify an Expiry Date and how long the prescription is Valid for. |
| − | *Any additional Notes can be made in the | + | *The Rx details can then be entered by either using the drop down lists, or by manually typing into the relevant text boxes. It is also possible to use the Up & Down arrow keys on the keyboard to help you with this selection. |
| − | + | *Any additional Notes can be made in the tab at the bottom of the screen. | |
==Adding a CL Specification== | ==Adding a CL Specification== | ||
| + | In order to add a Contact Lens Specification to a Record, follow the below instruction. | ||
| + | <center>[[image:PatientsCLRx2022.png|border|900px|CL Specification]]</center> | ||
| + | *You will first need a patient record. | ||
| + | *Select the Prescription tab located at the bottom of the Record screen. | ||
| + | *Click on the Contact Lens Icon. | ||
| + | *Click on the Add New Prescription button. | ||
| + | *You will now be able to enter the Date, the Optician that provided the Specification and a brief Description. Should the CL Specification have been given elsewhere, the Walk-In option allows you to specify this. You can also specify an Expiry Date and how long the prescription is Valid for. | ||
| + | *The Specification details can then be entered by either using the drop down lists, or by manually typing into the relevant text boxes. It is also possible to use the Up & Down arrow keys on the keyboard to help you with this selection. | ||
| + | *Any additional Notes can be made in the tab at the bottom of the screen. | ||
[[Patients|Back]] | [[Patients|Back]] | ||
| − | [[ | + | [[Optisoft.NET Help|Home]] |
Latest revision as of 14:41, 10 March 2022
Adding a Spectacle Prescription
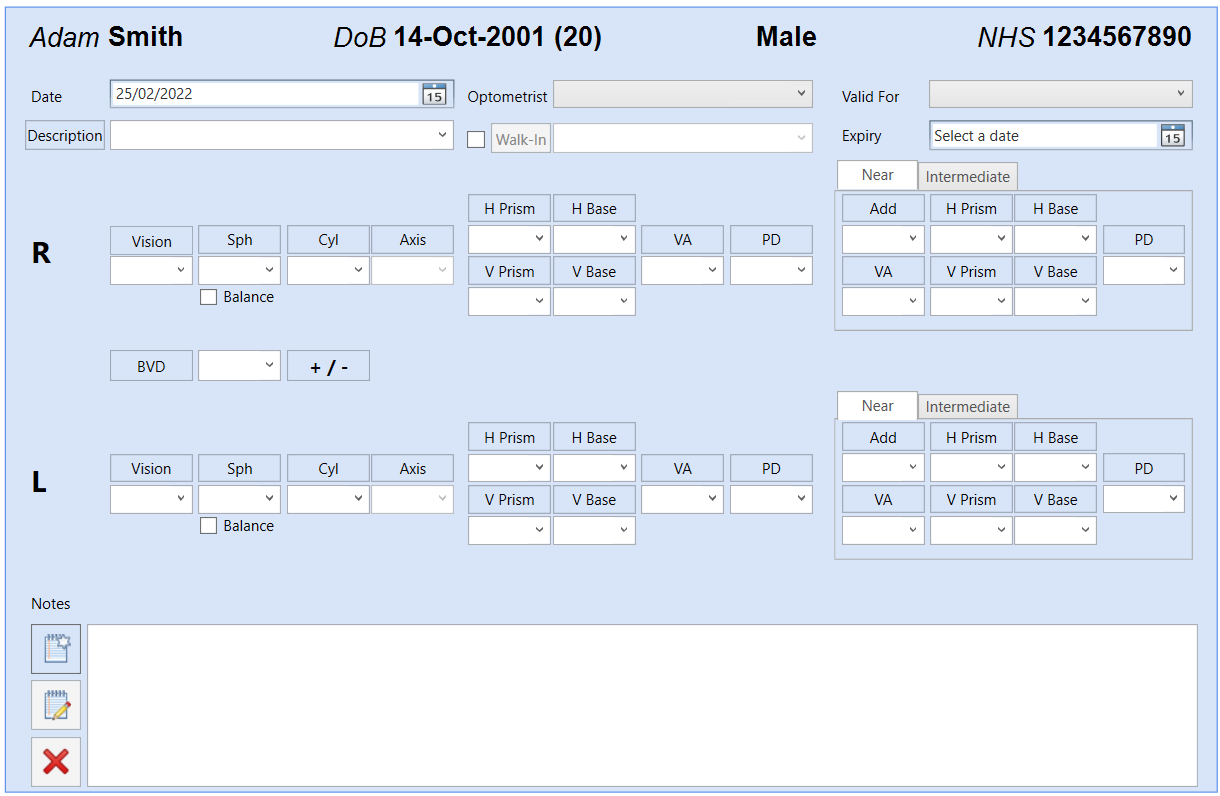
In order to add a Spectacle Prescription to a Record, follow the below instruction.

- You will first need to find a patient record.
- Select Add New Prescription from the Prescription tab located at the bottom of the Record screen.
- You will now be able to enter the Date, the Optician that provided the Rx and a brief Description. Should the Rx have been given elsewhere, the Walk-In option allows you to specify this. You can also specify an Expiry Date and how long the prescription is Valid for.
- The Rx details can then be entered by either using the drop down lists, or by manually typing into the relevant text boxes. It is also possible to use the Up & Down arrow keys on the keyboard to help you with this selection.
- Any additional Notes can be made in the tab at the bottom of the screen.
Adding a CL Specification
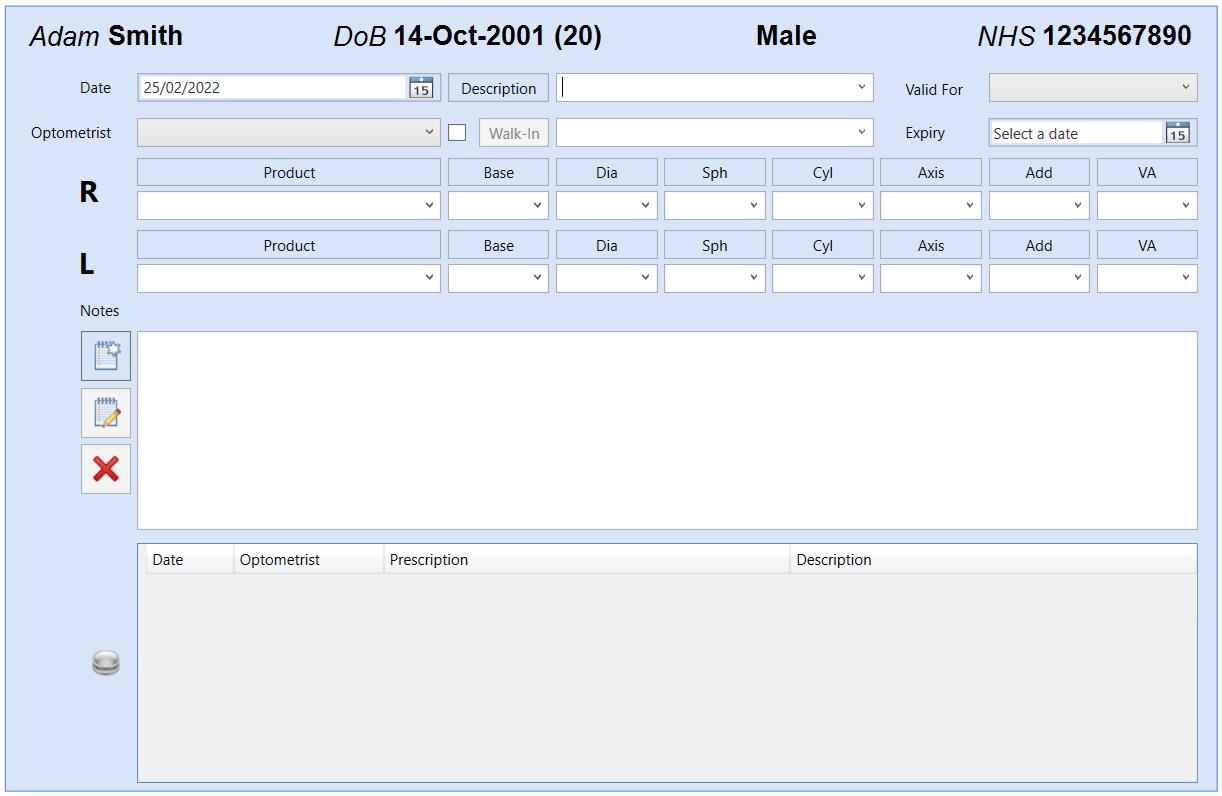
In order to add a Contact Lens Specification to a Record, follow the below instruction.

- You will first need a patient record.
- Select the Prescription tab located at the bottom of the Record screen.
- Click on the Contact Lens Icon.
- Click on the Add New Prescription button.
- You will now be able to enter the Date, the Optician that provided the Specification and a brief Description. Should the CL Specification have been given elsewhere, the Walk-In option allows you to specify this. You can also specify an Expiry Date and how long the prescription is Valid for.
- The Specification details can then be entered by either using the drop down lists, or by manually typing into the relevant text boxes. It is also possible to use the Up & Down arrow keys on the keyboard to help you with this selection.
- Any additional Notes can be made in the tab at the bottom of the screen.