Difference between revisions of "Maintaining the Patient Module"
(→Setting the Fields) |
(→Calibrating GOS Forms) |
||
| (40 intermediate revisions by the same user not shown) | |||
| Line 1: | Line 1: | ||
| − | + | __TOC__ | |
| − | <center>[[image: | + | <center>[[image:PatientsBlank2022.png|border|1020px|Patient Record]]</center> |
==Setting the Fields== | ==Setting the Fields== | ||
| − | Optisoft. | + | Optisoft.NET allows you to change the way your patient record looks depending on your preferences. |
| − | Some of the fields on the patient record have multiple options. For example, clicking on the arrow next to 'Home', will display the option 'Work'. | + | Some of the fields on the patient record have multiple options. For example, clicking on the arrow next to 'Home', will display the option 'Work', for a work address. |
<center>[[image:FieldsMenu.jpg|border|150px|Fields Menu]]</center> | <center>[[image:FieldsMenu.jpg|border|150px|Fields Menu]]</center> | ||
| − | You can change which option is displayed by simply clicking on edit, and then reordering the options in the list. The one at the top will be the one that is displayed on the Record. | + | You can change which option is displayed by simply clicking on edit, and then reordering the options in the list. The one at the top will be the one that is displayed on the Record. Alternatively, per patient record, you can specify which field is to be displayed by making it the default. In either case, should the default fields information be left empty and another fields information be populated, Optisoft.NET will automatically display this information for you. |
| − | + | In addition, you can add items into the list should you need to record extra address, for example. | |
==Installing Postcodes== | ==Installing Postcodes== | ||
| Line 19: | Line 19: | ||
To install this feature please contact the support desk for further assistance. | To install this feature please contact the support desk for further assistance. | ||
| − | ==Entering | + | ==Entering Contacts/Staff== |
| − | To enter a | + | To enter a Contact or Staff record follow the below procedure. |
| − | *Click on the | + | *Click on the Contact/Staff button on the main Record screen (this is likely to be labelled Optometrist). This will take you to Contact/Staff Maintenance. |
| − | <center>[[image: | + | <center>[[image:StaffMaintenance2022.png|border|1020px|Branch Contact Maintenance]]</center> |
| − | *Enter the details of the staff member making sure you tick the correct Type on the | + | *Enter the details of the staff member making sure you tick the correct Type on the left hand side. |
| − | *If you would like extra Contact Types adding into the list, simply click the | + | *If you would like extra Contact Types adding into the list, simply click the Type button. |
| − | *Click Save and then Back to finish. | + | *Click Save and then Back to finish, or use the Auto Save feature. |
| − | ==Entering | + | ==Entering Group/Surgery & Group Contact/GP Information== |
| − | ===Entering a Surgery=== | + | ===Entering a Group/Surgery=== |
| − | To enter a Surgery follow the below procedure. | + | To enter a Group/Surgery follow the below procedure. |
| − | *Click on the Surgery button on the main Record screen. This will take you to Surgery Maintenance. | + | *Click on the Group/Surgery button on the main Record screen. This will take you to Group/Surgery Maintenance. |
| − | <center>[[image:SurgeryMaintenance. | + | <center>[[image:SurgeryMaintenance.png|border|1020px|Surgery Maintenance]]</center> |
| − | *Enter the details of the Surgery. | + | *Enter the details of the Group/Surgery. |
| − | *Click Save and then Back to finish. | + | *Click Save and then Back to finish, or use the Auto Save feature. |
| − | ===Entering a GP=== | + | ===Entering a Group Contact/GP=== |
| − | To enter a GP follow the below procedure. | + | To enter a Group Contact/GP follow the below procedure. |
| − | *Click on the Surgery button on the main Record screen. This will take you to Surgery Maintenance. | + | *Click on the Group/Surgery button on the main Record screen. This will take you to Group/Surgery Maintenance. |
| − | *Find a Surgery you want to add a GP to and click the Contacts button. This will take you to | + | *Find a Group/Surgery you want to add a Group Contact/GP to and click the Contacts button. This will take you to Group Contact Maintenance. |
| − | *Enter the GP details making sure you tick the correct box on the right hand side. | + | *Enter the Group Contact/GP details making sure you tick the correct box on the right hand side. |
| − | *Click Save and then Back when you are finished. | + | *Click Save and then Back when you are finished, or use the Auto Save feature. |
==Field Validation== | ==Field Validation== | ||
| + | With some information that is added into your database, it is important that silly mistakes are not made upon data entry. For example, starting a UK mobile telephone number with something other than '07'. | ||
| + | |||
| + | To assist with this, Optisoft.NET has some built in validation checks. | ||
| + | |||
| + | You will notice that the text you start typing will be red until the correct validation requirements are met. Upon meeting these requirements the text will turn black. | ||
| + | |||
| + | To configure Field Validation, on some maintenance screens you will notice the following section. | ||
| + | |||
| + | <center>[[image:Validation.jpg|border|700px|Field Validation]]</center> | ||
| + | |||
| + | Simply tick the desired validation requirements and click Save then Back. | ||
==Input Masks== | ==Input Masks== | ||
| + | Input Masks prevent the user from entering Characters or Numbers in the wrong place of a field, for example, entering letters into a Home Telephone number. You can also specify whether upper or lower case letters should be used. | ||
| + | |||
| + | To configure Input Masks, on some maintenance screens you will notice the following section. | ||
| + | |||
| + | <center>[[image:NewInputMasks.jpg|border|700px|Input Masks]]</center> | ||
| + | |||
| + | The following options can be typed into the Input Mask text box: | ||
| + | |||
| + | *Type a > to specify uppercase letters | ||
| + | *Type a < to specify lowercase letters | ||
| + | *Type a L to specify a letter | ||
| + | *Type a 9 to specify a digit or space | ||
| + | |||
| + | You can then test your Input Mask by typing into the Test Mask text box. | ||
| + | |||
| + | When you are ready click Save and Back to finish. | ||
| + | |||
| + | ==Configuring Analysis Codes== | ||
| + | First, find a patient, then click the Analysis button. You can also use the Maintenance ribbon at the top of the screen. | ||
| + | |||
| + | To edit the Analysis Types follow the below procedure: | ||
| + | *Click the Type button. | ||
| + | *Enter the new type into the Name text box. | ||
| + | *You can also select a text colour for all codes under this type. | ||
| + | *Click Save and then Back when you have finished, or use the Auto Save feature. | ||
| + | |||
| + | To edit the Analysis Codes follow the below procedure: | ||
| + | *Click the Code button. | ||
| + | *Select the Analysis Type you would like your new code to be associated with. | ||
| + | *Enter the new code into the Name text box | ||
| + | *Click Save and then Back when you have finished, or use the Auto Save feature. | ||
| + | |||
| + | ==Calibrating GOS Forms== | ||
| + | In order to get your GOS Forms aligned you must calibrate them to your printer. The calibration is printer specific, so if you wish to print to a different printer, or replace your original one, you will need to calibrate the Forms again. | ||
| + | |||
| + | <center>[[image:GOSPrintCalibrationMay23.png|border|1020px|Gos Form Calibration]]</center> | ||
| − | + | In order to calibrate the GOS Forms follow the below procedure: | |
| − | + | *You will need to find a patient record. | |
| + | *Click on the GOS Forms button. | ||
| + | *Select the GOS 1 Form and fill out as much information as you can. | ||
| + | *Click on the Printing tab to the right of the screen. | ||
| + | *Ensure the correct printer is selected and put a GOS 1 Form in the printer. Click Page 1 to print. | ||
| + | *Now click on the Calibration tab to the right of the screen. | ||
| + | *Using the controls you now need to make your screen match your print out. Move the fields using the Move and Stretch controls so that they are positioned exactly where they appear on you print out. | ||
| + | *When ready click Save Page 1 Calibration. | ||
| + | *Now print your GOS 1 Page 1 again and repeat the above process if necessary. | ||
| + | *You will then need to repeat the process again for Page 2 of the GOS 1 Form. | ||
| + | *Once this is done all the other GOS Forms should now also be aligned. | ||
[[Patients|Back]] | [[Patients|Back]] | ||
[[Optisoft.NET Help|Home]] | [[Optisoft.NET Help|Home]] | ||
Latest revision as of 13:44, 30 May 2023
Contents
Setting the Fields
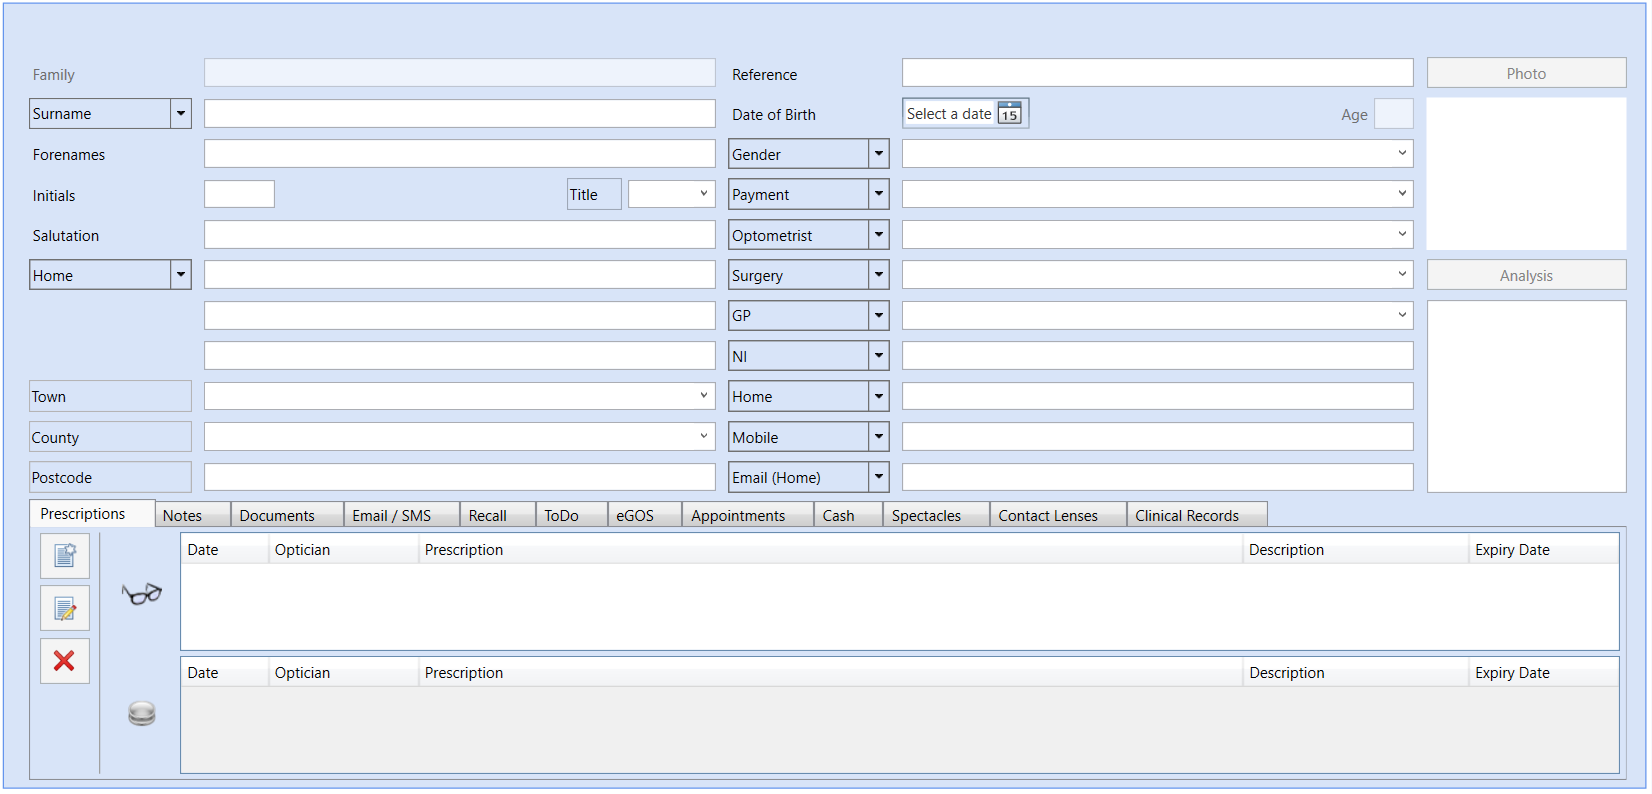
Optisoft.NET allows you to change the way your patient record looks depending on your preferences.
Some of the fields on the patient record have multiple options. For example, clicking on the arrow next to 'Home', will display the option 'Work', for a work address.
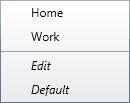
You can change which option is displayed by simply clicking on edit, and then reordering the options in the list. The one at the top will be the one that is displayed on the Record. Alternatively, per patient record, you can specify which field is to be displayed by making it the default. In either case, should the default fields information be left empty and another fields information be populated, Optisoft.NET will automatically display this information for you.
In addition, you can add items into the list should you need to record extra address, for example.
Installing Postcodes
Optisoft.NET features an automatic postcode search to help you with the entering of patient address.
To install this feature please contact the support desk for further assistance.
Entering Contacts/Staff
To enter a Contact or Staff record follow the below procedure.
- Click on the Contact/Staff button on the main Record screen (this is likely to be labelled Optometrist). This will take you to Contact/Staff Maintenance.
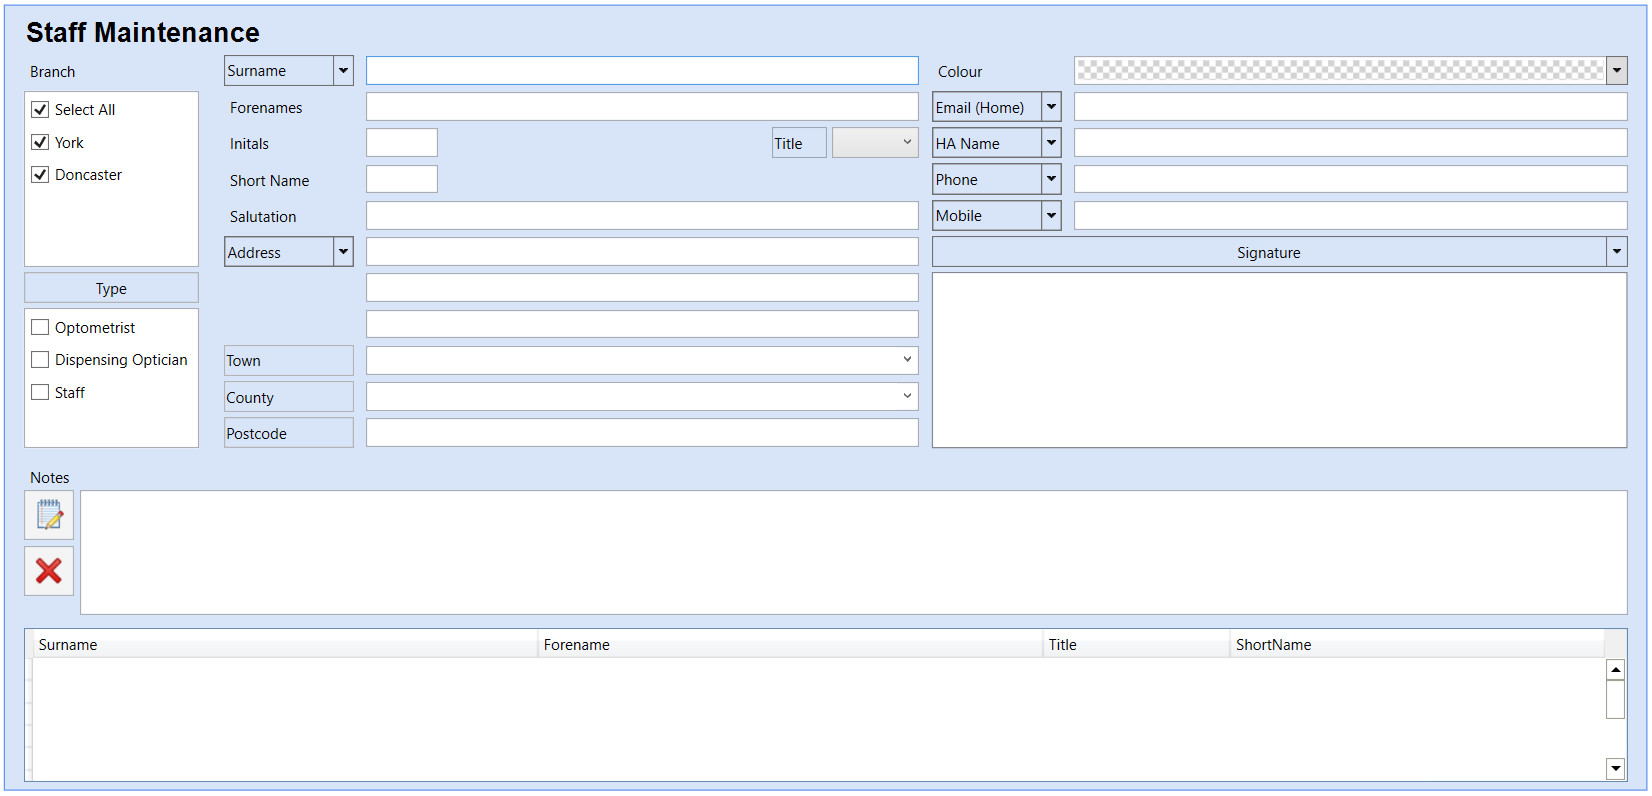
- Enter the details of the staff member making sure you tick the correct Type on the left hand side.
- If you would like extra Contact Types adding into the list, simply click the Type button.
- Click Save and then Back to finish, or use the Auto Save feature.
Entering Group/Surgery & Group Contact/GP Information
Entering a Group/Surgery
To enter a Group/Surgery follow the below procedure.
- Click on the Group/Surgery button on the main Record screen. This will take you to Group/Surgery Maintenance.
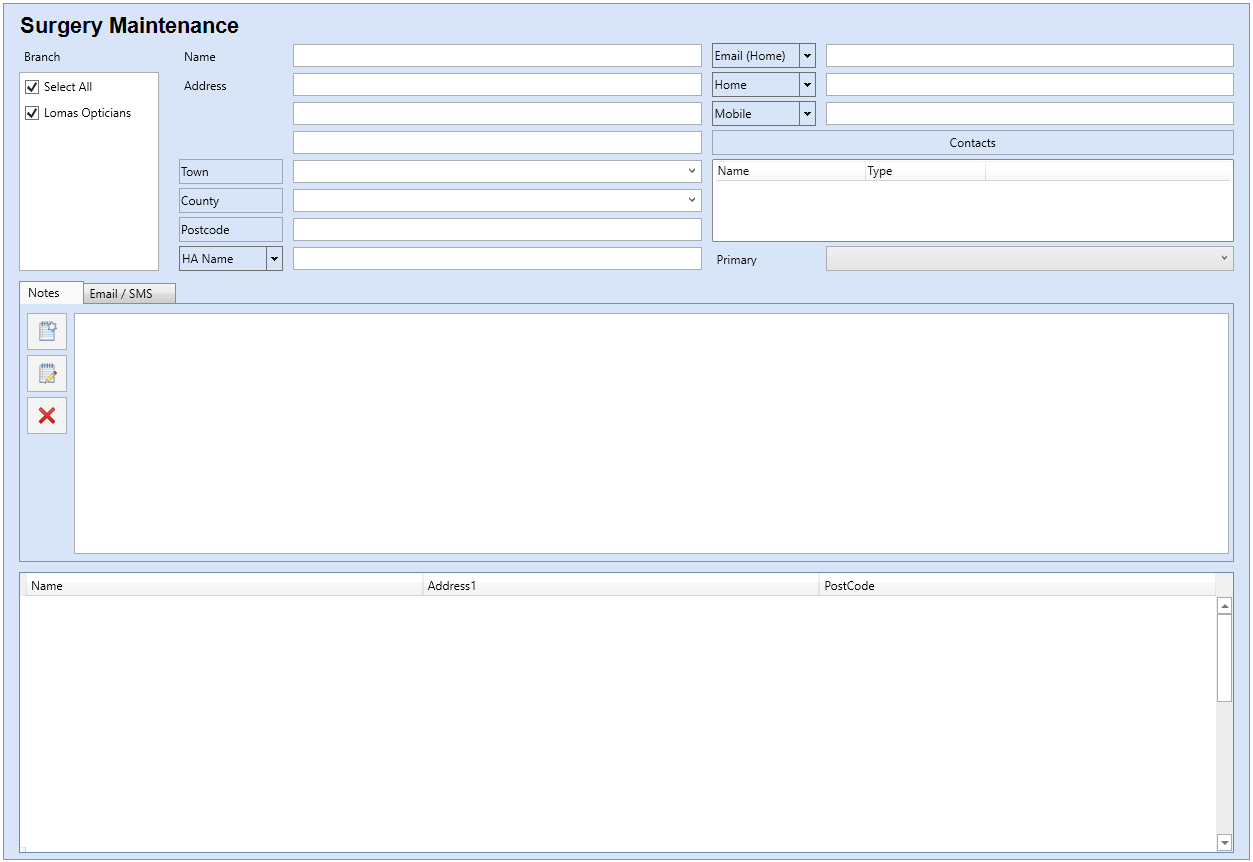
- Enter the details of the Group/Surgery.
- Click Save and then Back to finish, or use the Auto Save feature.
Entering a Group Contact/GP
To enter a Group Contact/GP follow the below procedure.
- Click on the Group/Surgery button on the main Record screen. This will take you to Group/Surgery Maintenance.
- Find a Group/Surgery you want to add a Group Contact/GP to and click the Contacts button. This will take you to Group Contact Maintenance.
- Enter the Group Contact/GP details making sure you tick the correct box on the right hand side.
- Click Save and then Back when you are finished, or use the Auto Save feature.
Field Validation
With some information that is added into your database, it is important that silly mistakes are not made upon data entry. For example, starting a UK mobile telephone number with something other than '07'.
To assist with this, Optisoft.NET has some built in validation checks.
You will notice that the text you start typing will be red until the correct validation requirements are met. Upon meeting these requirements the text will turn black.
To configure Field Validation, on some maintenance screens you will notice the following section.

Simply tick the desired validation requirements and click Save then Back.
Input Masks
Input Masks prevent the user from entering Characters or Numbers in the wrong place of a field, for example, entering letters into a Home Telephone number. You can also specify whether upper or lower case letters should be used.
To configure Input Masks, on some maintenance screens you will notice the following section.

The following options can be typed into the Input Mask text box:
- Type a > to specify uppercase letters
- Type a < to specify lowercase letters
- Type a L to specify a letter
- Type a 9 to specify a digit or space
You can then test your Input Mask by typing into the Test Mask text box.
When you are ready click Save and Back to finish.
Configuring Analysis Codes
First, find a patient, then click the Analysis button. You can also use the Maintenance ribbon at the top of the screen.
To edit the Analysis Types follow the below procedure:
- Click the Type button.
- Enter the new type into the Name text box.
- You can also select a text colour for all codes under this type.
- Click Save and then Back when you have finished, or use the Auto Save feature.
To edit the Analysis Codes follow the below procedure:
- Click the Code button.
- Select the Analysis Type you would like your new code to be associated with.
- Enter the new code into the Name text box
- Click Save and then Back when you have finished, or use the Auto Save feature.
Calibrating GOS Forms
In order to get your GOS Forms aligned you must calibrate them to your printer. The calibration is printer specific, so if you wish to print to a different printer, or replace your original one, you will need to calibrate the Forms again.
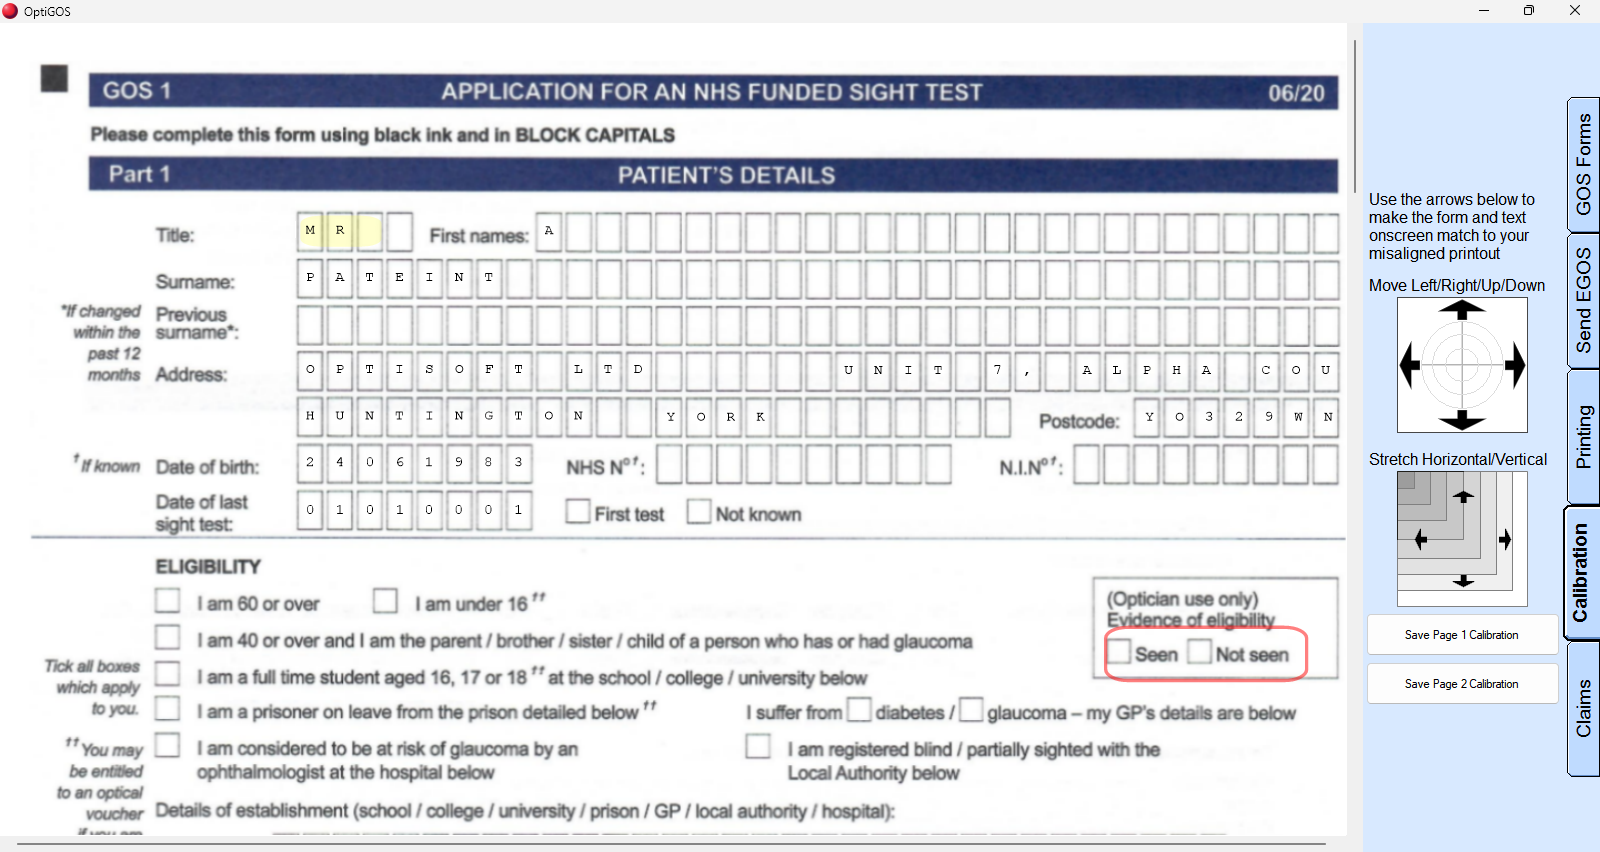
In order to calibrate the GOS Forms follow the below procedure:
- You will need to find a patient record.
- Click on the GOS Forms button.
- Select the GOS 1 Form and fill out as much information as you can.
- Click on the Printing tab to the right of the screen.
- Ensure the correct printer is selected and put a GOS 1 Form in the printer. Click Page 1 to print.
- Now click on the Calibration tab to the right of the screen.
- Using the controls you now need to make your screen match your print out. Move the fields using the Move and Stretch controls so that they are positioned exactly where they appear on you print out.
- When ready click Save Page 1 Calibration.
- Now print your GOS 1 Page 1 again and repeat the above process if necessary.
- You will then need to repeat the process again for Page 2 of the GOS 1 Form.
- Once this is done all the other GOS Forms should now also be aligned.