Difference between revisions of "Creating a Transaction"
(Created page with "Home") |
(→Selling) |
||
| (25 intermediate revisions by the same user not shown) | |||
| Line 1: | Line 1: | ||
| + | A complete Transaction is made up of two sections, Sales and Payments. However, it might be necessary to split Sales and Payments across multiple transactions, depending on the actual circumstances. The below example assumes you are going to sell and then pay for some products, in the same transaction. | ||
| + | |||
| + | Please note, if at any stage during a transaction you need to cancel what you have done, or start again, you can either use the Delete Item or No Sale buttons. | ||
| + | |||
| + | Delete Item will delete a single item and allow you to continue in the same transaction. | ||
| + | |||
| + | No Sale will void the entire transaction and allow you to start from the beginning of the next transaction. | ||
| + | |||
| + | <center>[[image:CashMay23.png|border|900px]]</center> | ||
| + | |||
| + | ==Selling== | ||
| + | In order to Sell a Product in a transaction, you need to do the following. | ||
| + | |||
| + | *If necessary, start by finding the relevant patient record in the Patient module. Alternatively, if a patient is not required, you can use the OTC button in the toolbar, to clear the active patient. | ||
| + | *Go to the Cash module. | ||
| + | *Click a Product Type. | ||
| + | *If you have cash security turned on, log into the till with your username and password. Alternatively, you can use your fob to log in at this stage. | ||
| + | *Select the appropriate Product Category, Supplier and Product. | ||
| + | *Enter a price, if necessary, and press Enter. | ||
| + | *Repeat the above for as many different products as needed. To help you with this, if you want to sell a similar product, a '+' symbol will appear at the end of each entry in the product grid. This will create a new product with the same Type and Category as the one selected. You can then enter the remaining details as normal. | ||
| + | *Next either following the instructions in the Paying section to enter a payment, or, confirm the transaction using the methods below. | ||
| + | |||
| + | ==Paying== | ||
| + | In order to process a Payment in a transaction, you need to do the following. | ||
| + | *Sell some items using the above method. | ||
| + | *Click a Payment Type. | ||
| + | *Click a Payment Category. | ||
| + | *Enter a value, if necessary, and press Enter. | ||
| + | *Repeat the above for as many different payments as needed. | ||
| + | |||
| + | ==Confirming a Transaction== | ||
| + | As previously mentioned, it may not be necessary to Sell and Pay in the same transaction, however, when you are ready to complete the transaction you need to confirm it by using the Sale button. | ||
| + | |||
| + | <center>[[image:SaleConfrimMay23.png|border|400px]]</center> | ||
| + | |||
| + | When you have done this you will be presented with a Confirmation Popup. Details on the popup are: | ||
| + | *Account Balance - Any previous balance on the patients account. | ||
| + | *Transaction Total - The total value of sales for the current transaction. | ||
| + | *Tendered - The total value of payments for the current transaction. | ||
| + | *Outstanding Balance - The balance that will be left on the patients account, once the current transaction is completed. | ||
| + | *Change - Any change owing to the patient. | ||
| + | |||
| + | This popup is designed to allow you to review your transaction before completing it. | ||
| + | |||
| + | Please note, once you have completed a transaction, there is no way of deleting it. | ||
| + | |||
| + | The Confirmation Popup has the following options: | ||
| + | *On Account - This option will only be available if you have a patient record selected on the current transaction. To be used if any outstanding money is to remain on the patients account instead of returning it to them. | ||
| + | *Email Receipt - This option will email a copy of the receipt to the displayed email address. If the email address if blank, any email entered will save back to the patient record when the transaction is completed. | ||
| + | *Save Receipt as PDF - This will save the receipt as a PDF file on your computer. | ||
| + | *Include Patient Address - This will print the patients default address on the receipt. | ||
| + | *Cancel - Will cancel the popup and return the patient to the main Cash screen. | ||
| + | *Confirm No Receipt - Will confirm the transaction and add it to the database, but will produce not receipt. | ||
| + | *Confirm with Receipt - Will confirm the transaction and add it to the database, and produce a receipt. | ||
| + | |||
| + | |||
| + | [[Cash|Back]] | ||
| + | |||
[[Optisoft.NET Help|Home]] | [[Optisoft.NET Help|Home]] | ||
Latest revision as of 08:59, 31 May 2023
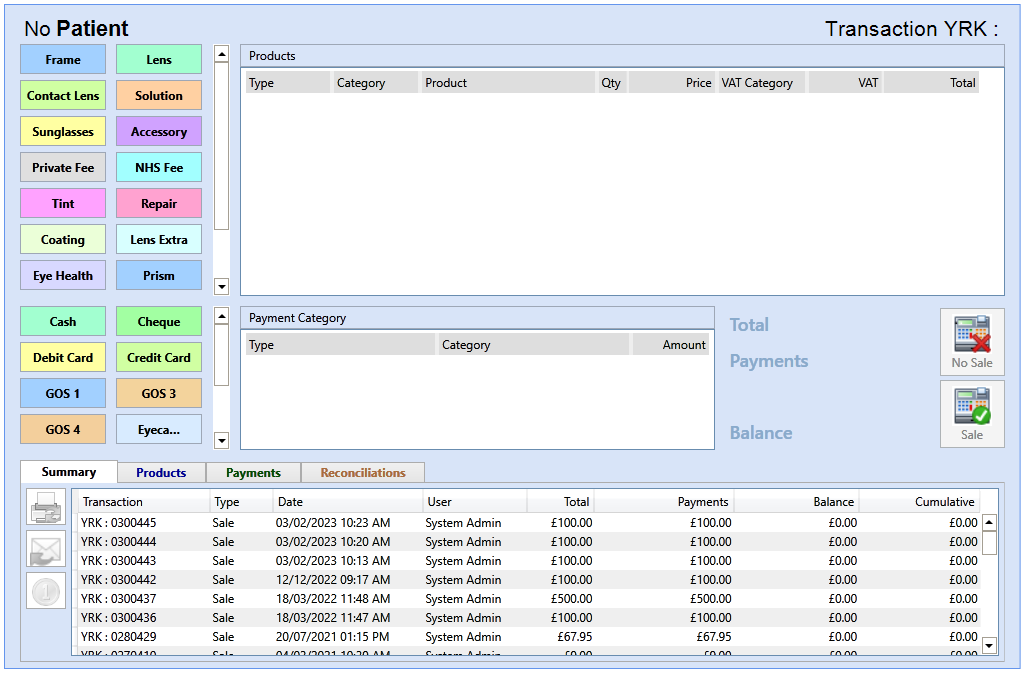
A complete Transaction is made up of two sections, Sales and Payments. However, it might be necessary to split Sales and Payments across multiple transactions, depending on the actual circumstances. The below example assumes you are going to sell and then pay for some products, in the same transaction.
Please note, if at any stage during a transaction you need to cancel what you have done, or start again, you can either use the Delete Item or No Sale buttons.
Delete Item will delete a single item and allow you to continue in the same transaction.
No Sale will void the entire transaction and allow you to start from the beginning of the next transaction.

Selling
In order to Sell a Product in a transaction, you need to do the following.
- If necessary, start by finding the relevant patient record in the Patient module. Alternatively, if a patient is not required, you can use the OTC button in the toolbar, to clear the active patient.
- Go to the Cash module.
- Click a Product Type.
- If you have cash security turned on, log into the till with your username and password. Alternatively, you can use your fob to log in at this stage.
- Select the appropriate Product Category, Supplier and Product.
- Enter a price, if necessary, and press Enter.
- Repeat the above for as many different products as needed. To help you with this, if you want to sell a similar product, a '+' symbol will appear at the end of each entry in the product grid. This will create a new product with the same Type and Category as the one selected. You can then enter the remaining details as normal.
- Next either following the instructions in the Paying section to enter a payment, or, confirm the transaction using the methods below.
Paying
In order to process a Payment in a transaction, you need to do the following.
- Sell some items using the above method.
- Click a Payment Type.
- Click a Payment Category.
- Enter a value, if necessary, and press Enter.
- Repeat the above for as many different payments as needed.
Confirming a Transaction
As previously mentioned, it may not be necessary to Sell and Pay in the same transaction, however, when you are ready to complete the transaction you need to confirm it by using the Sale button.

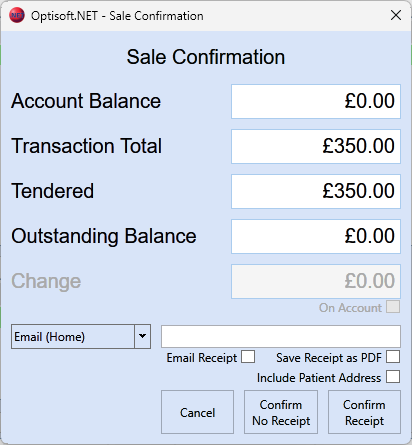
When you have done this you will be presented with a Confirmation Popup. Details on the popup are:
- Account Balance - Any previous balance on the patients account.
- Transaction Total - The total value of sales for the current transaction.
- Tendered - The total value of payments for the current transaction.
- Outstanding Balance - The balance that will be left on the patients account, once the current transaction is completed.
- Change - Any change owing to the patient.
This popup is designed to allow you to review your transaction before completing it.
Please note, once you have completed a transaction, there is no way of deleting it.
The Confirmation Popup has the following options:
- On Account - This option will only be available if you have a patient record selected on the current transaction. To be used if any outstanding money is to remain on the patients account instead of returning it to them.
- Email Receipt - This option will email a copy of the receipt to the displayed email address. If the email address if blank, any email entered will save back to the patient record when the transaction is completed.
- Save Receipt as PDF - This will save the receipt as a PDF file on your computer.
- Include Patient Address - This will print the patients default address on the receipt.
- Cancel - Will cancel the popup and return the patient to the main Cash screen.
- Confirm No Receipt - Will confirm the transaction and add it to the database, but will produce not receipt.
- Confirm with Receipt - Will confirm the transaction and add it to the database, and produce a receipt.