Difference between revisions of "Creating a Clinical Record Visit"
| (3 intermediate revisions by the same user not shown) | |||
| Line 4: | Line 4: | ||
Upon doing so, the Pathways of that Visit will be displayed on the summary screen. | Upon doing so, the Pathways of that Visit will be displayed on the summary screen. | ||
| − | <center>[[image:ClinicalPathways2022.png|border|700px|Clinical Records | + | <center>[[image:ClinicalPathways2022.png|border|700px|Clinical Records Pathways]]</center> |
To complete the Visit, you will be required to complete each Pathway, starting with the one in the top left and working your way through to the one in the bottom right. | To complete the Visit, you will be required to complete each Pathway, starting with the one in the top left and working your way through to the one in the bottom right. | ||
| Line 26: | Line 26: | ||
A Single Notes page is designed with one text box in the middle of the screen that can be used to record the results of the current visit. | A Single Notes page is designed with one text box in the middle of the screen that can be used to record the results of the current visit. | ||
| − | <center>[[image:ClinicalSinglePage2022.png|border|700px|Clinical Records | + | <center>[[image:ClinicalSinglePage2022.png|border|700px|Clinical Records Single Notes Page]]</center> |
There is also a Previous Notes text box at the top of the screen, that will display the notes from the last instance of the same page. Notes can be manually typed, copied from a previous visit or entered by clicking on the Page Options that run down the right and left sides of the screen. | There is also a Previous Notes text box at the top of the screen, that will display the notes from the last instance of the same page. Notes can be manually typed, copied from a previous visit or entered by clicking on the Page Options that run down the right and left sides of the screen. | ||
| Line 33: | Line 33: | ||
A Split Notes page is designed with two text boxes in the middle of the screen that can be used to record the results of the current visit, one for the Right Eye and the other for the Left Eye. | A Split Notes page is designed with two text boxes in the middle of the screen that can be used to record the results of the current visit, one for the Right Eye and the other for the Left Eye. | ||
| − | <center>[[image:ClinicalSplitPage2022.png|border|700px|Clinical Records | + | <center>[[image:ClinicalSplitPage2022.png|border|700px|Clinical Records Split Notes Page]]</center> |
There is also 2 Previous Notes text boxes at the top of the screen, that will display the notes from the last instance of the same page. Notes can be manually typed, copied from a previous visit, copied from the Right Eye to the Left Eye or entered by clicking on the Page Options that run down the right and left sides of the screen. | There is also 2 Previous Notes text boxes at the top of the screen, that will display the notes from the last instance of the same page. Notes can be manually typed, copied from a previous visit, copied from the Right Eye to the Left Eye or entered by clicking on the Page Options that run down the right and left sides of the screen. | ||
| Line 40: | Line 40: | ||
A Spectacles Prescription page is where you will be able to record your spectacle prescription details. | A Spectacles Prescription page is where you will be able to record your spectacle prescription details. | ||
| − | <center>[[image:ClinicalSpecsRxPage2022.png|border|700px|Clinical Records | + | <center>[[image:ClinicalSpecsRxPage2022.png|border|700px|Clinical Records Spectacles Rx Page]]</center> |
Each field can be turned on or off so you can design pages differently, depending on what you wish to use it for. A Previous Rx box is at the top of the screen and a Notes text box below the Rx details, will link you to a dedicated Notes page so you can make additional notes. | Each field can be turned on or off so you can design pages differently, depending on what you wish to use it for. A Previous Rx box is at the top of the screen and a Notes text box below the Rx details, will link you to a dedicated Notes page so you can make additional notes. | ||
| Line 51: | Line 51: | ||
A Contact Lens Prescription page is where you will be able to record your contact lens prescription details. | A Contact Lens Prescription page is where you will be able to record your contact lens prescription details. | ||
| − | <center>[[image: | + | <center>[[image:ClinicalCLRxPage2022.png|border|700px|Clinical Contact Lens Rx Page]]</center> |
In addition to the Rx details, the contact lens Product can also be recorded. A Previous Rx box is at the top of the screen and a Notes text box below the Rx details, will link you to a dedicated Notes page so you can make additional notes. | In addition to the Rx details, the contact lens Product can also be recorded. A Previous Rx box is at the top of the screen and a Notes text box below the Rx details, will link you to a dedicated Notes page so you can make additional notes. | ||
| Line 58: | Line 58: | ||
*Copy a Prescription from the patients module. | *Copy a Prescription from the patients module. | ||
*Copy values from another Spectacles or CL Prescription page. | *Copy values from another Spectacles or CL Prescription page. | ||
| + | |||
| + | ===Previous Visits Tab=== | ||
| + | During a visit, in the Activity Pane on the right hand side of the software, the Previous Visits tab will be displayed. | ||
| + | |||
| + | <center>[[image:PreviousVisitsMay23.png|border|400px|Clinical Contact Lens Rx Page]]</center> | ||
| + | |||
| + | This tab allows you to view previous visits for the selected patient while performing the current visit. | ||
| + | |||
| + | You can scroll back and forth through the previous visits as necessary, using the arrow controls at the top of the tab. | ||
| + | |||
| + | You can also copy text from the previous visit, for use in the current visit and also make the text smaller or larger as required. | ||
Latest revision as of 08:21, 31 May 2023
Contents
Creating a New Visit
In order to create a new Clinical Records Visit you first of all need to choose a Staff Member and a Visit Type.
Upon doing so, the Pathways of that Visit will be displayed on the summary screen.
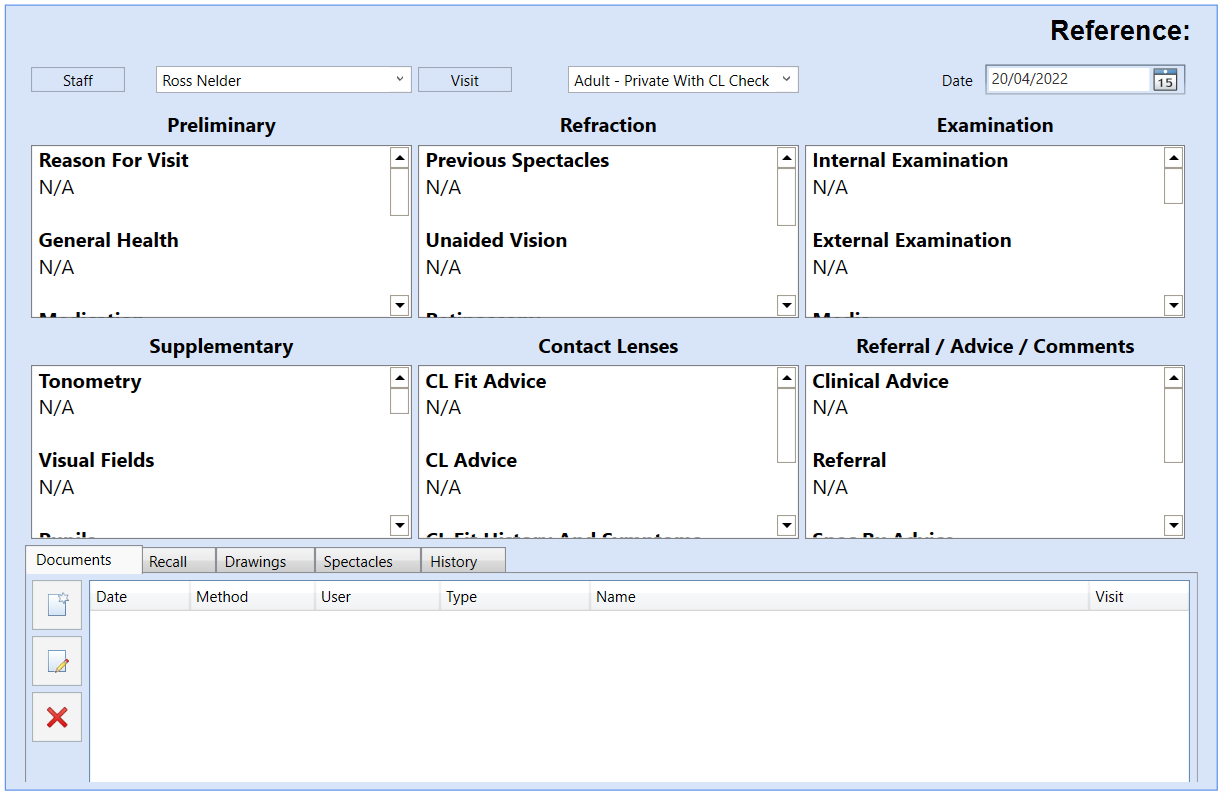
To complete the Visit, you will be required to complete each Pathway, starting with the one in the top left and working your way through to the one in the bottom right.
When ready, you can click on the first pathway to start the exam.
Pathways
Each Pathway contains a list of pages. Whilst in a Pathway, this list can always be viewed down the right hand side of the screen.
You can navigate from page to page by using the Next or Previous Page buttons at the bottom of the screen, or by clicking on the relevant page on the right.
You can also navigate between Pathways, by using the Next or Previous Pathway buttons.
In addition, you can also using the Open Page drop down in the toolbar ribbon, to navigate to any Page, on any Pathway at any stage of the Visit.
When on the final Page of the last Pathway, clicking the Finish button, will return you to the Summary page with your results displayed in each Pathway box.
Pages
A Page can be one of 4 different types as described below. When completing a Visit, you will enter your results on each Page within each Pathway.
Single Options page
A Single Notes page is designed with one text box in the middle of the screen that can be used to record the results of the current visit.
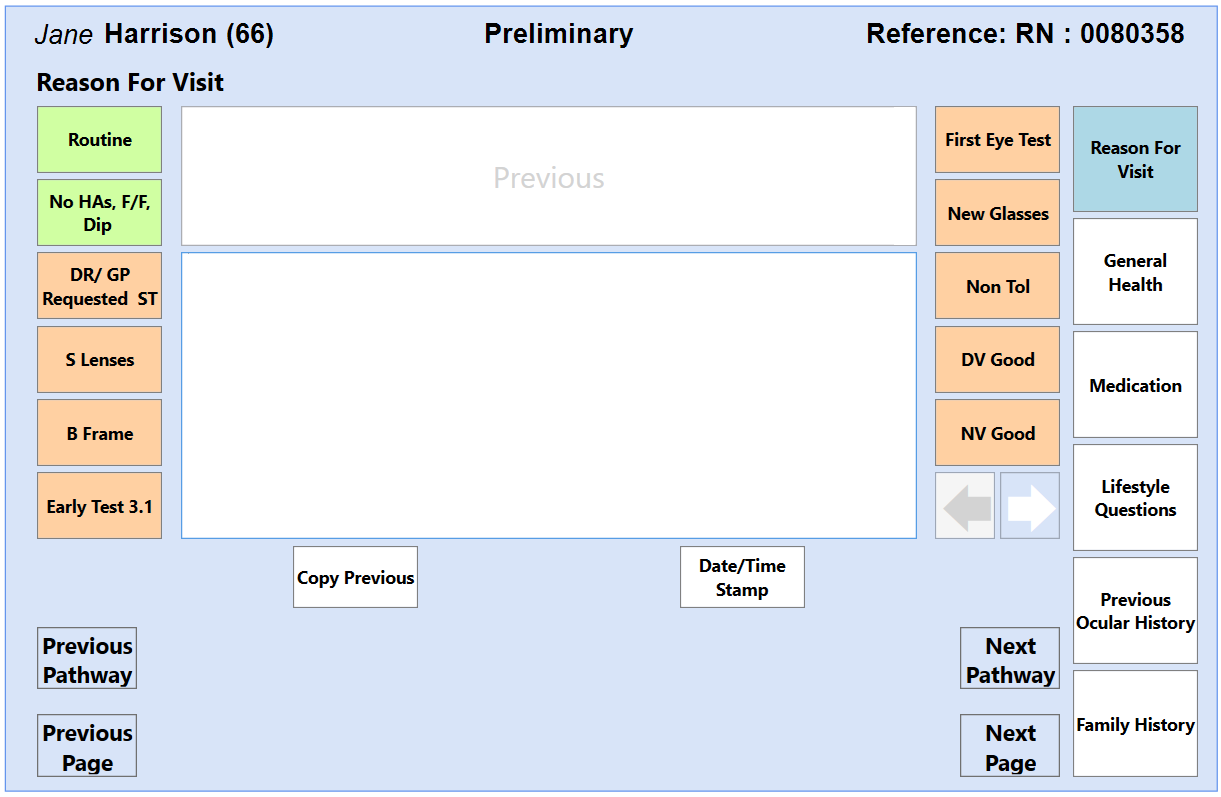
There is also a Previous Notes text box at the top of the screen, that will display the notes from the last instance of the same page. Notes can be manually typed, copied from a previous visit or entered by clicking on the Page Options that run down the right and left sides of the screen.
Split Options page
A Split Notes page is designed with two text boxes in the middle of the screen that can be used to record the results of the current visit, one for the Right Eye and the other for the Left Eye.
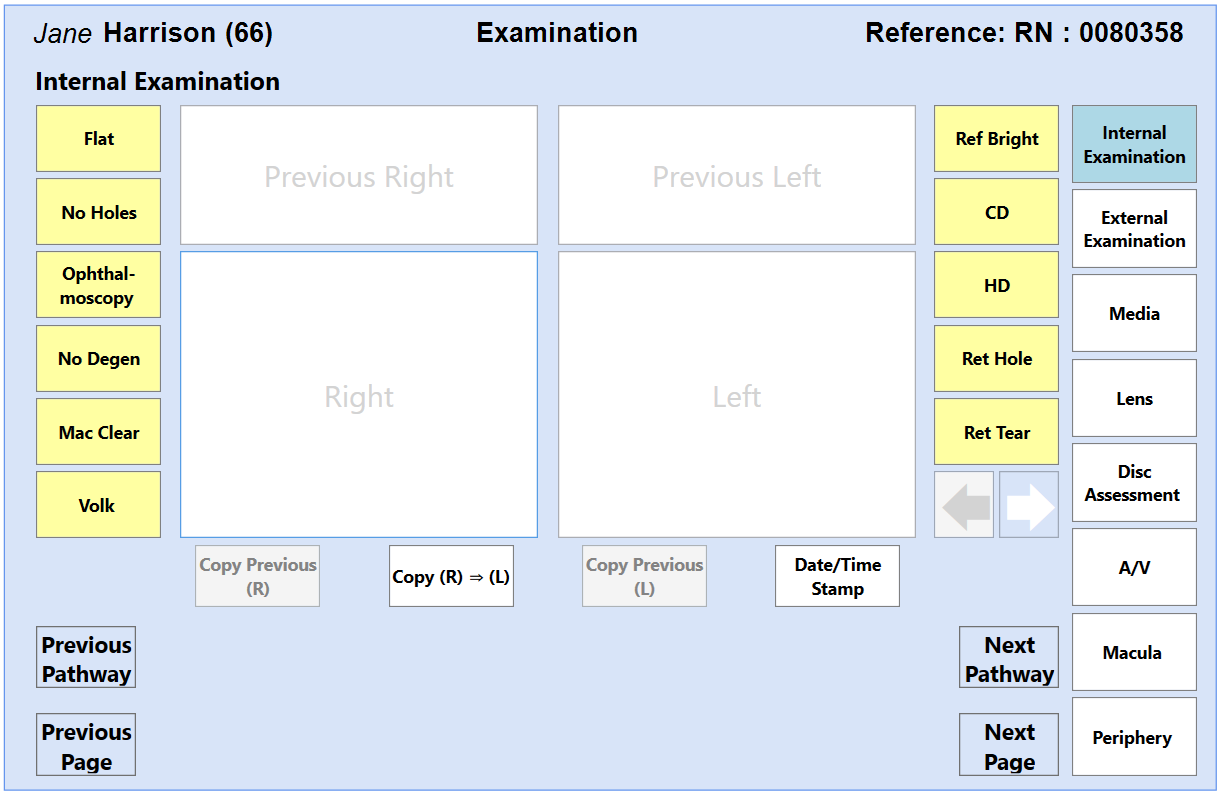
There is also 2 Previous Notes text boxes at the top of the screen, that will display the notes from the last instance of the same page. Notes can be manually typed, copied from a previous visit, copied from the Right Eye to the Left Eye or entered by clicking on the Page Options that run down the right and left sides of the screen.
Spectacles Prescription page
A Spectacles Prescription page is where you will be able to record your spectacle prescription details.
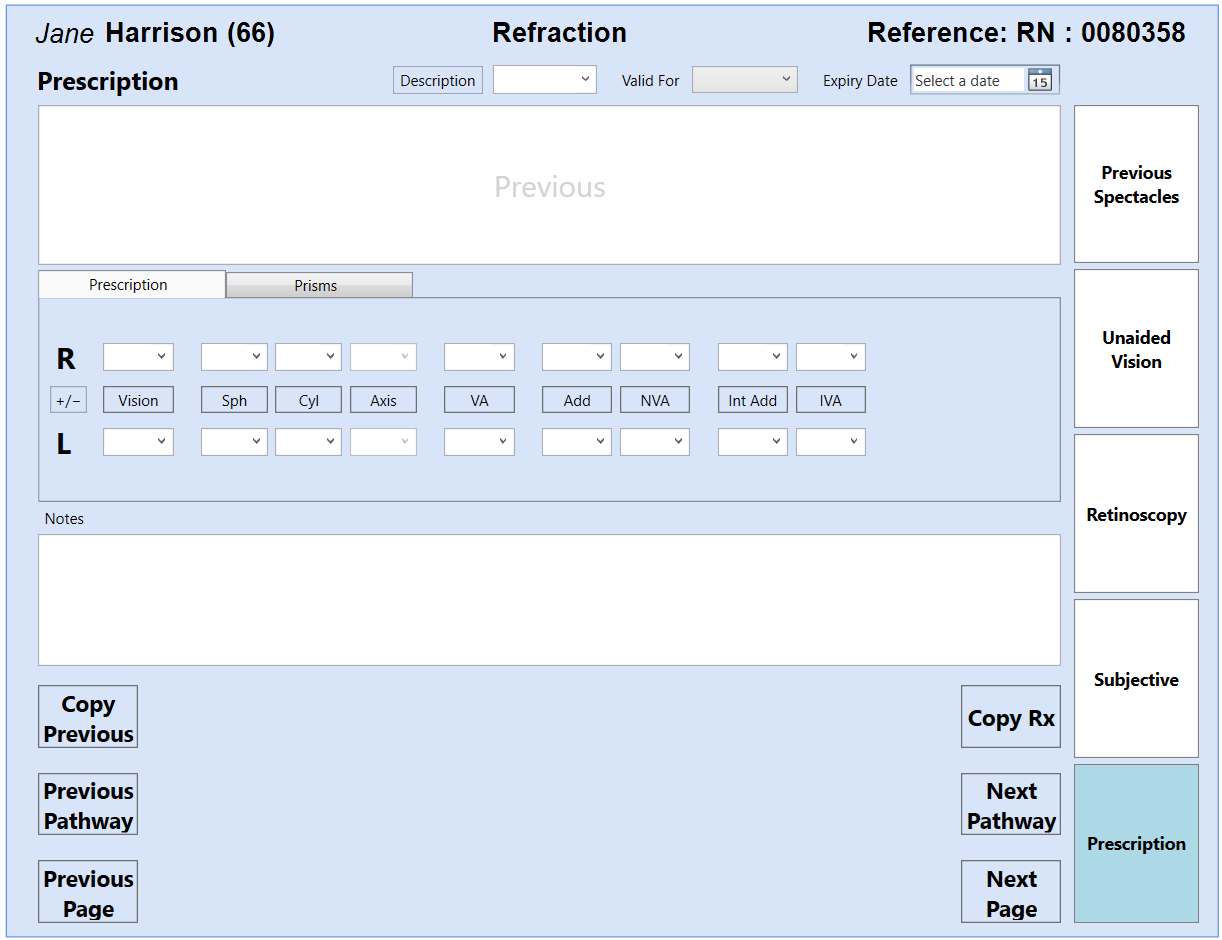
Each field can be turned on or off so you can design pages differently, depending on what you wish to use it for. A Previous Rx box is at the top of the screen and a Notes text box below the Rx details, will link you to a dedicated Notes page so you can make additional notes.
The Copy Rx button will allow you to either:
- Copy a Prescription from the patients module.
- Copy values from another Spectacles or CL Prescription page.
Contact Lens Prescription page
A Contact Lens Prescription page is where you will be able to record your contact lens prescription details.
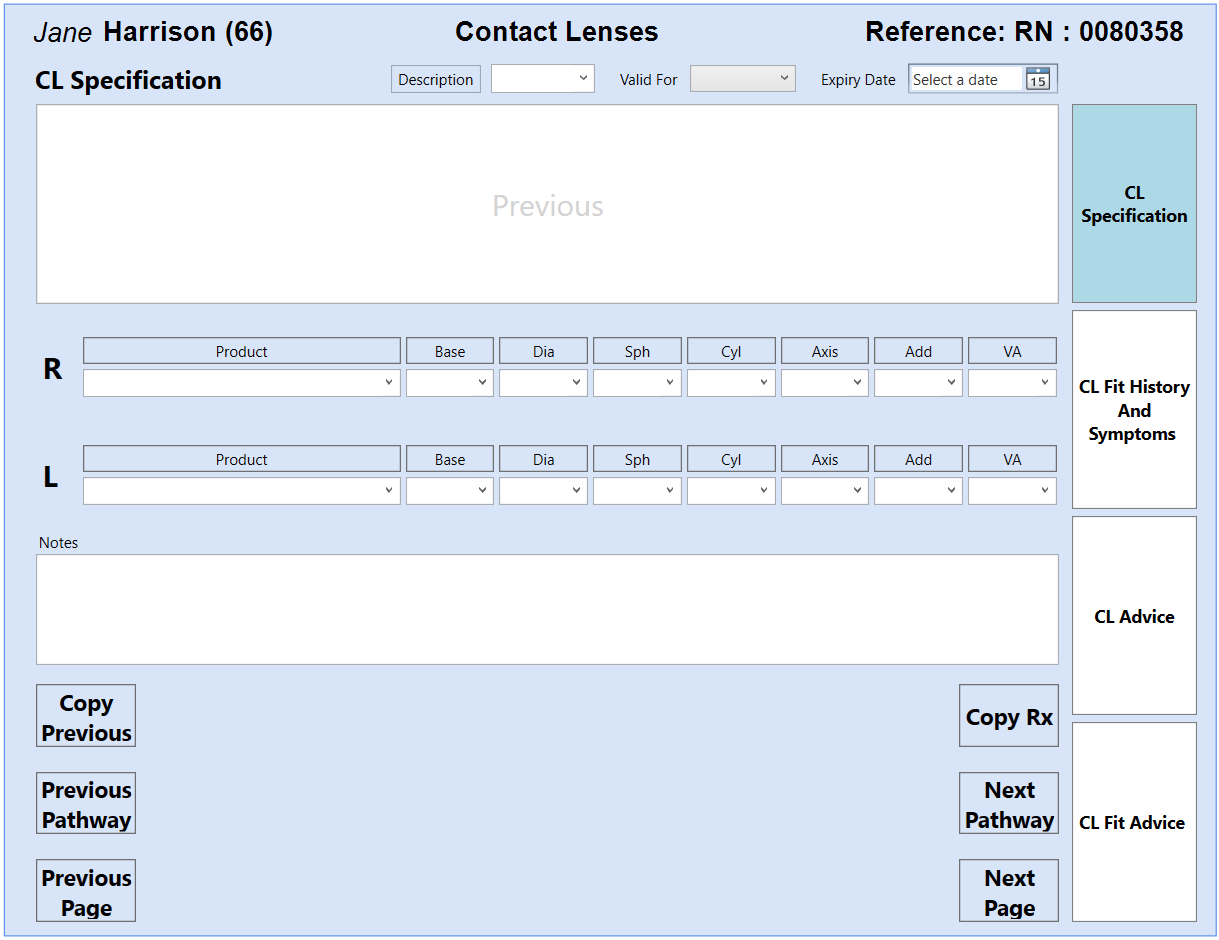
In addition to the Rx details, the contact lens Product can also be recorded. A Previous Rx box is at the top of the screen and a Notes text box below the Rx details, will link you to a dedicated Notes page so you can make additional notes.
The Copy Rx button will allow you to either:
- Copy a Prescription from the patients module.
- Copy values from another Spectacles or CL Prescription page.
Previous Visits Tab
During a visit, in the Activity Pane on the right hand side of the software, the Previous Visits tab will be displayed.
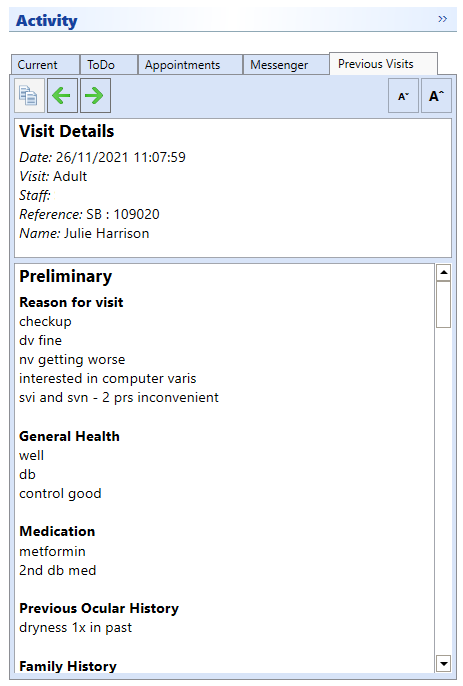
This tab allows you to view previous visits for the selected patient while performing the current visit.
You can scroll back and forth through the previous visits as necessary, using the arrow controls at the top of the tab.
You can also copy text from the previous visit, for use in the current visit and also make the text smaller or larger as required.