Difference between revisions of "Processing Patient Recalls"
(→Additional Features) |
|||
| (25 intermediate revisions by the same user not shown) | |||
| Line 1: | Line 1: | ||
| + | |||
| + | ==Processing a Recall Run== | ||
| + | In order to process Patient Recalls, follow the below instruction. | ||
| + | |||
| + | <center>[[image:ModuleRecall2022.png|border|1020px|Recall Graph]]</center> | ||
| + | |||
| + | *First click on the Recall module | ||
| + | *You will be presented with the Graph tab which will display the next 12 time periods, starting from the first outstanding Patient Recall onward. | ||
| + | *By default the Recall module will try and process all outstanding recalls up to the present date, unless the present date is not displayed in the graph (as it is too far in the future). In this case the Recall Module will try and process the first 12 periods shown | ||
| + | *You can change what periods are shown by selecting the desired option (Daily, Weekly or Monthly) in the Date section of the toolbar | ||
| + | *You can also filter by Method, Branch, Recall Type, Recall Category, Recall Band and Staff Member as necessary | ||
| + | *When ready click on the Run tab | ||
| + | |||
| + | |||
| + | <center>[[image:RecallRunTab2022.png|border|1020px|Recall Run]]</center> | ||
| + | |||
| + | *On the Run tab you will notice that the Total column will be populated with the values that you had from the Graph tab | ||
| + | *Per Method you can now decide how many of each you wish to process, by typing the desired number into the Run column | ||
| + | *As you type, you will notice the data grid will start to display the patient records that are relevant to the recalls that you are about to process | ||
| + | *Highlighting one of these records will display useful information about that patient, such as address, contact details and recall dates | ||
| + | *If required you can remove a patient from this recall run by taking the tick out of the tick box in the process column | ||
| + | *When ready click on the Process button in the toolbar, and your recall run will commence | ||
| + | *When your recalls have finished processing, you will be returned to the Graph tab. You will notice that the graph will have updated values, ready for your next recall run | ||
| + | |||
| + | ==Additional Features== | ||
| + | ===Custom Period=== | ||
| + | As mentioned the Recall module will always try and keep you up to date. However, there may be some situations where you don't require to be up to date, or need to process future recalls. In either of these cases, on the Run tab there is a Custom Period tick box. Ticking this box will display a Date Picker which allows you to define when the Recall should be calculated up to. | ||
| + | |||
| + | <center>[[image:RecallCustom.jpg|border|Recall Run Custom Period]]</center> | ||
| + | |||
| + | Changing the date will automatically repopulate the vales in the Total column, taking into account all the filtering options you selected previously on the graph tab. You can then proceed with you recall run as normal. | ||
| + | |||
| + | ===Display Enclosures=== | ||
| + | By default active enclosures are not displayed. If you require to see which enclosures are going to be applied to each patient, you can tick the Display Enclosures tick box and a column will appear in the data grid showing the first active enclosure per patient. | ||
| + | |||
| + | <center>[[image:RecallEnclosures.jpg|border|Recall Run Display Enclosures]]</center> | ||
| + | |||
| + | ===Recycle Bin=== | ||
| + | Should you require to process recalls from your recall graph without any product, ticking the Recycle Bin tick box before processing the Patient Recalls will do just that. | ||
| + | |||
| + | <center>[[image:RecallRecycle.jpg|border|Recall Run Recycle Bin]]</center> | ||
| + | |||
| + | ===Export=== | ||
| + | The Export tick box will allow you to create an electronic copy of your recall run, instead of sending it to the printer. This can be useful if you want your recalls to be printed by an external company. | ||
| + | |||
| + | ===Automatic Recall Graph=== | ||
| + | The Recall Module caters for the automatic processing of Patient Recalls, as configured in Recall Band Maintenance. As a user you don't need to do anything to process these recalls, however, should you want to know how many recalls will be processed in the future, clicking on the Automatic button in the toolbar will show you the Automatic Recall Graph. | ||
| + | |||
| + | |||
[[Recall|Back]] | [[Recall|Back]] | ||
[[Optisoft.NET Help|Home]] | [[Optisoft.NET Help|Home]] | ||
Latest revision as of 13:57, 30 May 2023
Contents
Processing a Recall Run
In order to process Patient Recalls, follow the below instruction.

- First click on the Recall module
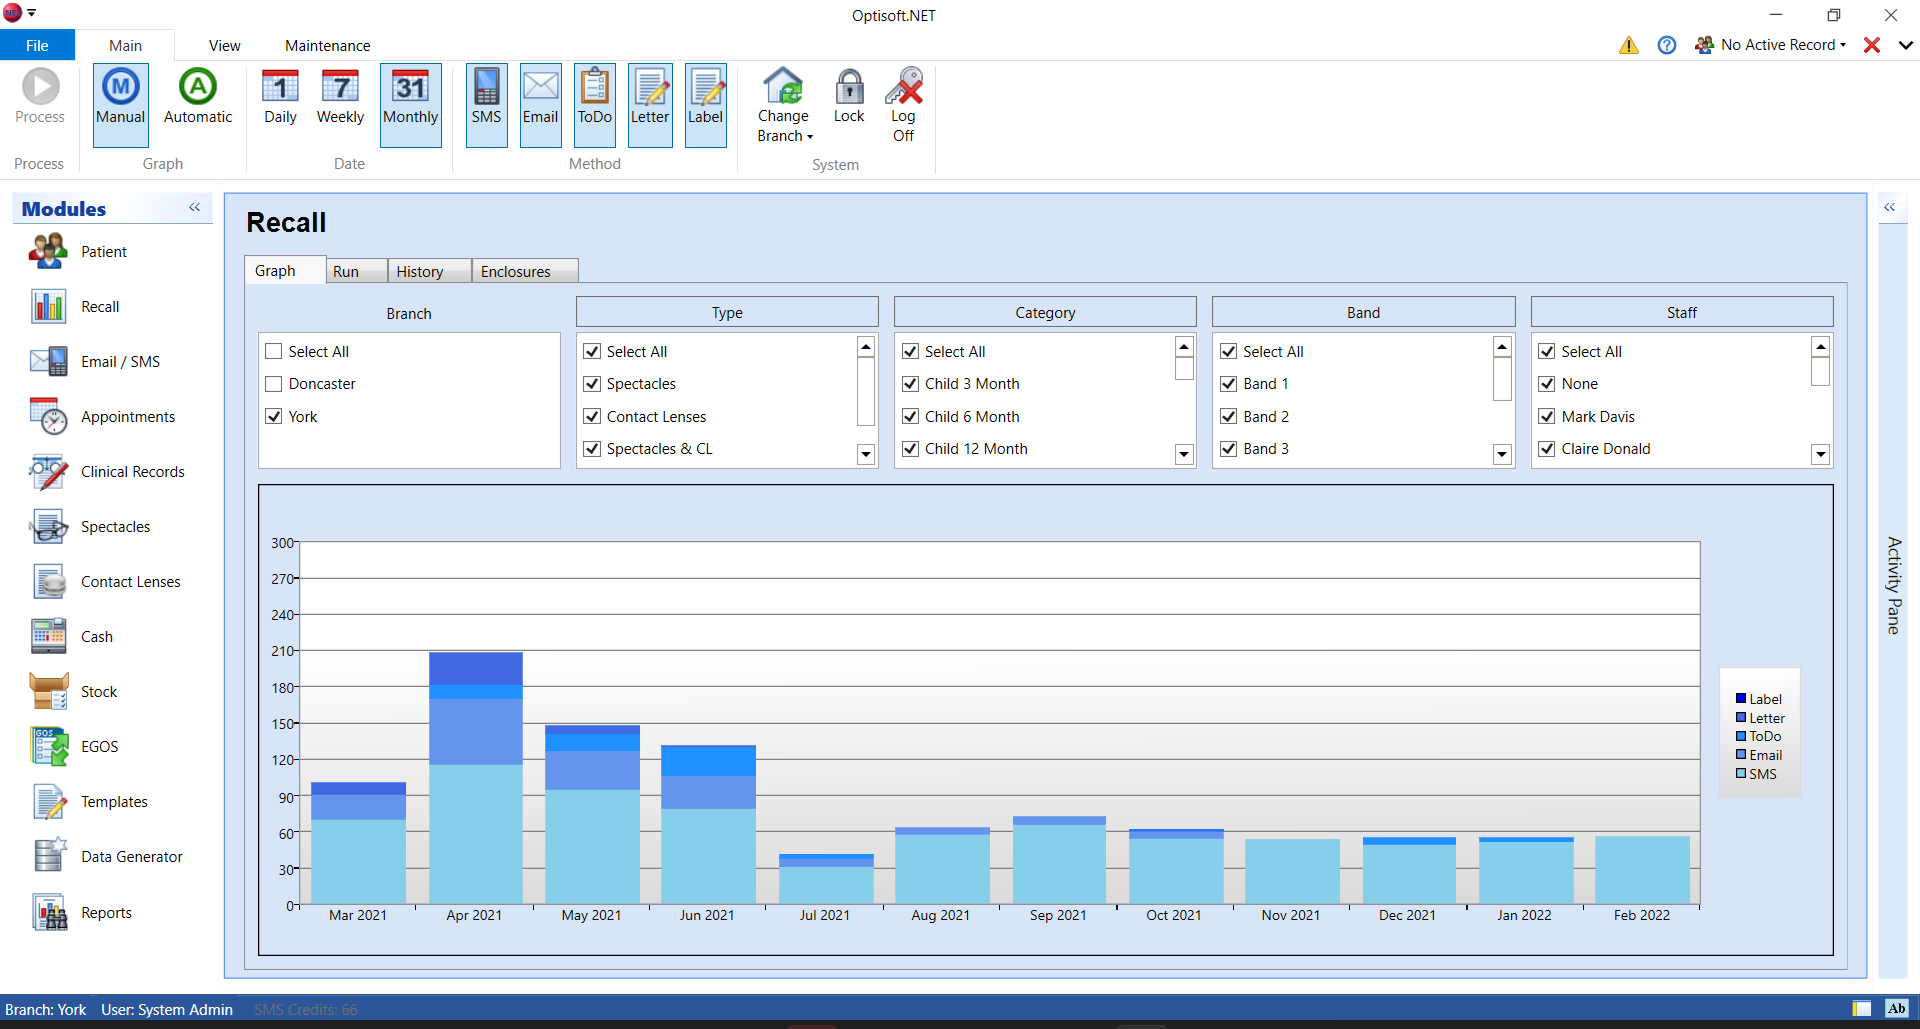
- You will be presented with the Graph tab which will display the next 12 time periods, starting from the first outstanding Patient Recall onward.
- By default the Recall module will try and process all outstanding recalls up to the present date, unless the present date is not displayed in the graph (as it is too far in the future). In this case the Recall Module will try and process the first 12 periods shown
- You can change what periods are shown by selecting the desired option (Daily, Weekly or Monthly) in the Date section of the toolbar
- You can also filter by Method, Branch, Recall Type, Recall Category, Recall Band and Staff Member as necessary
- When ready click on the Run tab

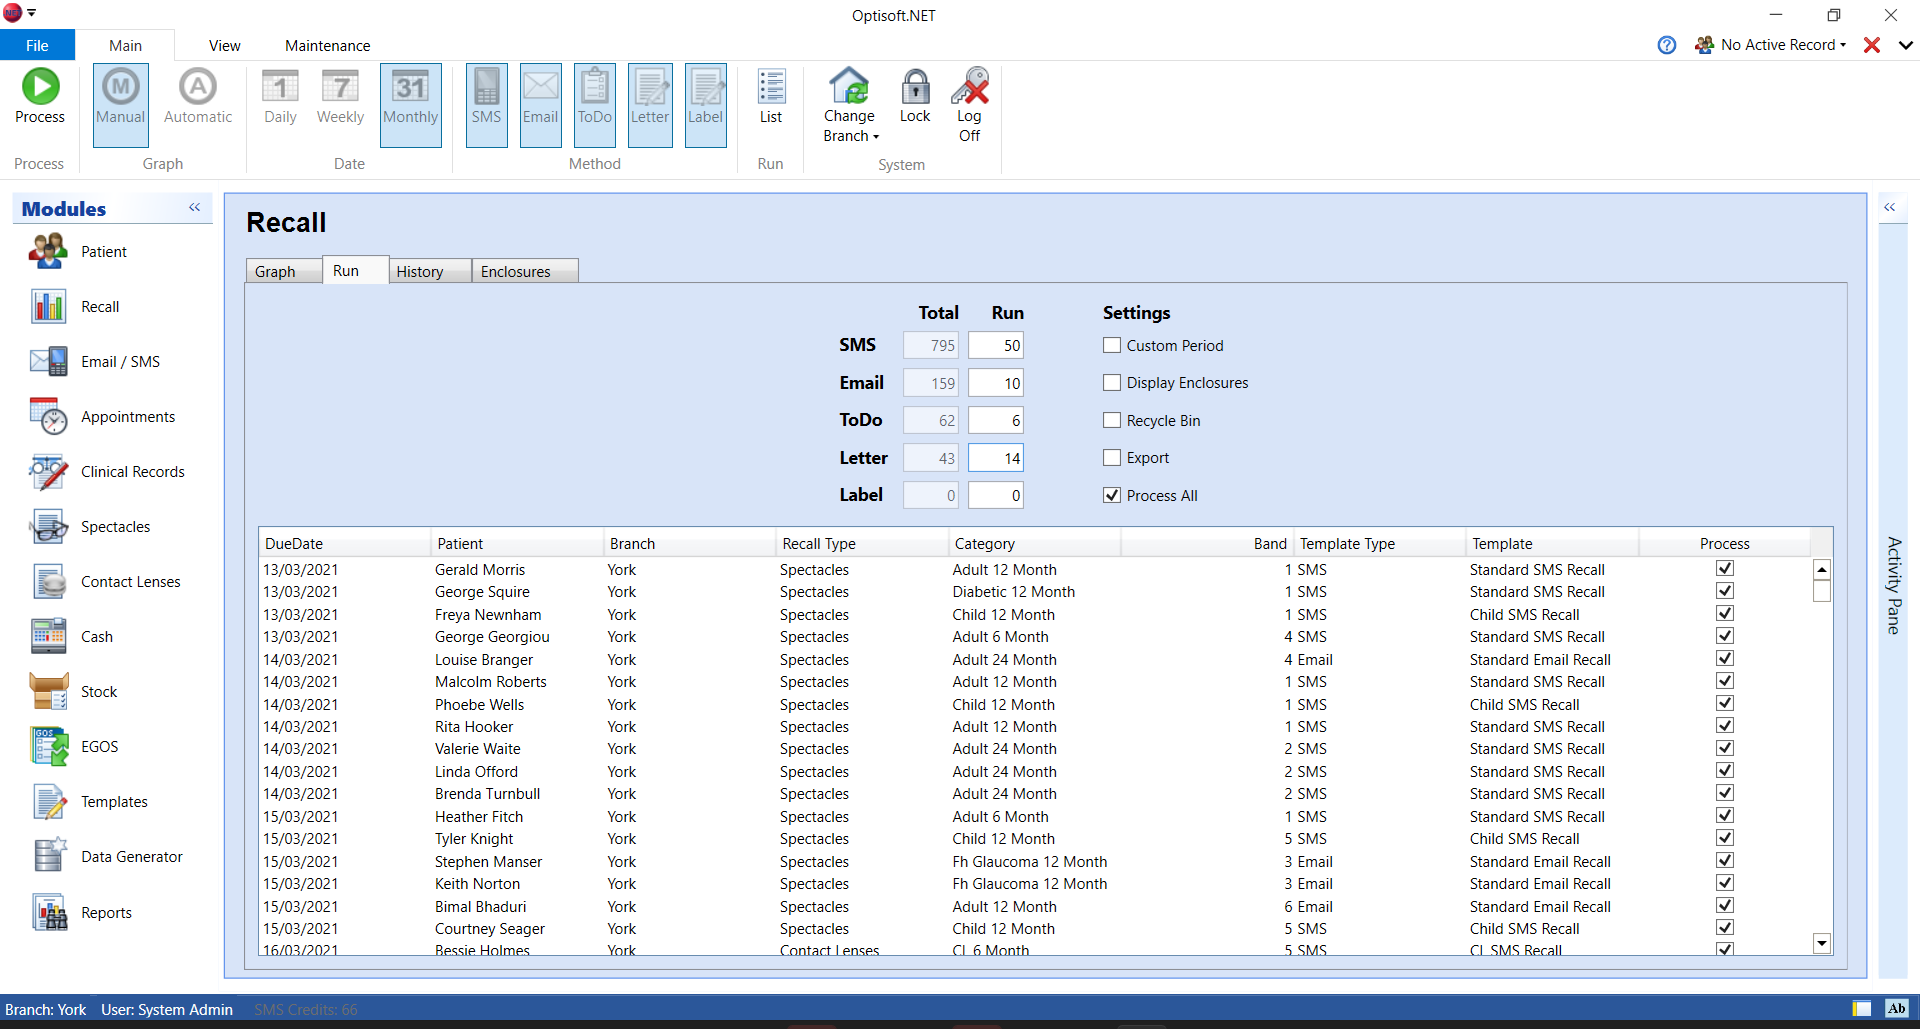
- On the Run tab you will notice that the Total column will be populated with the values that you had from the Graph tab
- Per Method you can now decide how many of each you wish to process, by typing the desired number into the Run column
- As you type, you will notice the data grid will start to display the patient records that are relevant to the recalls that you are about to process
- Highlighting one of these records will display useful information about that patient, such as address, contact details and recall dates
- If required you can remove a patient from this recall run by taking the tick out of the tick box in the process column
- When ready click on the Process button in the toolbar, and your recall run will commence
- When your recalls have finished processing, you will be returned to the Graph tab. You will notice that the graph will have updated values, ready for your next recall run
Additional Features
Custom Period
As mentioned the Recall module will always try and keep you up to date. However, there may be some situations where you don't require to be up to date, or need to process future recalls. In either of these cases, on the Run tab there is a Custom Period tick box. Ticking this box will display a Date Picker which allows you to define when the Recall should be calculated up to.
Changing the date will automatically repopulate the vales in the Total column, taking into account all the filtering options you selected previously on the graph tab. You can then proceed with you recall run as normal.
Display Enclosures
By default active enclosures are not displayed. If you require to see which enclosures are going to be applied to each patient, you can tick the Display Enclosures tick box and a column will appear in the data grid showing the first active enclosure per patient.
Recycle Bin
Should you require to process recalls from your recall graph without any product, ticking the Recycle Bin tick box before processing the Patient Recalls will do just that.
Export
The Export tick box will allow you to create an electronic copy of your recall run, instead of sending it to the printer. This can be useful if you want your recalls to be printed by an external company.
Automatic Recall Graph
The Recall Module caters for the automatic processing of Patient Recalls, as configured in Recall Band Maintenance. As a user you don't need to do anything to process these recalls, however, should you want to know how many recalls will be processed in the future, clicking on the Automatic button in the toolbar will show you the Automatic Recall Graph.