Difference between revisions of "Maintaining the Cash Module"
(→Creating Payment Categories) |
|||
| (24 intermediate revisions by the same user not shown) | |||
| Line 2: | Line 2: | ||
==Creating Product Types== | ==Creating Product Types== | ||
| + | To create a Product Type in the Cash Module, you need to do the following. | ||
| + | |||
| + | <center>[[image:ProductType2022.png|border|900px]]</center> | ||
| + | |||
| + | *Go to the Cash Module. | ||
| + | *Click the Maintenance tab in the toolbar. | ||
| + | *Click Type in the Product group. | ||
| + | *Enter a Product Type Name. | ||
| + | *Select a VAT type. | ||
| + | *Choose a colour. | ||
| + | *Select a validation option. | ||
| + | *Click Save or use the Auto Save feature. | ||
==Creating Product Categories== | ==Creating Product Categories== | ||
| + | To create a Product Category in the Cash Module, you need to do the following. | ||
| + | |||
| + | <center>[[image:ProductCategory2022.png|border|900px]]</center> | ||
| + | |||
| + | *Go to the Cash Module. | ||
| + | *Click the Maintenance tab in the toolbar. | ||
| + | *Click Category in the Product group. | ||
| + | *Choose a Product Type for your Category | ||
| + | *Enter a Product Category Name. | ||
| + | *Choose a colour. | ||
| + | *Click Save or use the Auto Save feature. | ||
==Creating Payment Types== | ==Creating Payment Types== | ||
| + | To create a Payment Type in the Cash Module, you need to do the following. | ||
| + | |||
| + | <center>[[image:PaymentType2022.png|border|900px]]</center> | ||
| + | |||
| + | *Go to the Cash Module. | ||
| + | *Click the Maintenance tab in the toolbar. | ||
| + | *Click Type in the Payment group. | ||
| + | *Enter a Payment Type Name. | ||
| + | *Choose a colour. | ||
| + | *Select a validation option. | ||
| + | *Select the appropriate choices from the Options list. | ||
| + | **Open Drawer - Will open the till drawer when this Payment Type is used in a transaction. | ||
| + | *Click Save or use the Auto Save feature. | ||
==Creating Payment Categories== | ==Creating Payment Categories== | ||
| + | To create a Payment Category in the Cash Module, you need to do the following. | ||
| − | + | <center>[[image:PaymentCategoryMaintenanceMay23.png|border|900px]]</center> | |
| + | |||
| + | *Go to the Cash Module. | ||
| + | *Click the Maintenance tab in the toolbar. | ||
| + | *Click Category in the Payment group. | ||
| + | *Choose a Payment Type for your Category | ||
| + | *Enter a Payment Category Name. | ||
| + | *Enter a Value if necessary. | ||
| + | Instead of entering a value in the previous step, you could choose an Automatic Value in the next combo box. This value will be maintained by Optisoft and automatically update when value changes occur. | ||
| + | *Choose a colour. | ||
| + | *Click Save or use the Auto Save feature. | ||
==Creating a Receipt Template== | ==Creating a Receipt Template== | ||
| + | Creating a Receipt Template is done through the Receipt Editor. | ||
| + | |||
| + | First you will need to go to the Templates Module, click New, select Type Cash and click Template Editor in the Toolbar. | ||
| + | |||
| + | To find you how to create your receipt template, click the link below. | ||
| + | |||
| + | [[Create a Receipt Template|Create a Receipt Template]] | ||
==Adding Adjustments== | ==Adding Adjustments== | ||
| + | To create a Adjustment in the Cash Module, you need to do the following. | ||
| + | |||
| + | <center>[[image:AdjustmentMaintenance2022.png|border|900px]]</center> | ||
| + | |||
| + | *Go to the Cash Module. | ||
| + | *Click the Maintenance tab in the toolbar. | ||
| + | *Click Adjustment in the Cash group. | ||
| + | *Enter a Adjustment Name. | ||
| + | *Double click, or use the arrow buttons, on each Product Type this Adjustment will effect. They will be added to the Selected list. | ||
| + | *Choose from a Value or Percent adjustment. | ||
| + | *Choose from Add or Subtract. | ||
| + | *Enter a relevant Amount. | ||
| + | *Click Save or use the Auto Save feature. | ||
==Creating Petty Cash Categories== | ==Creating Petty Cash Categories== | ||
| + | To create a Petty Cash Category in the Cash Module, you need to do the following. | ||
| + | |||
| + | <center>[[image:PettyCashTypeMaintenance2022.png|border|900px]]</center> | ||
| + | |||
| + | *Go to the Cash Module. | ||
| + | *Click the Maintenance tab in the toolbar. | ||
| + | *Click Petty Cash in the Cash group. | ||
| + | *Enter a Petty Cash Category Name. | ||
| + | *Select a VAT type. | ||
| + | *Click Save or use the Auto Save feature. | ||
Latest revision as of 09:52, 31 May 2023
Contents
Creating Product Types
To create a Product Type in the Cash Module, you need to do the following.
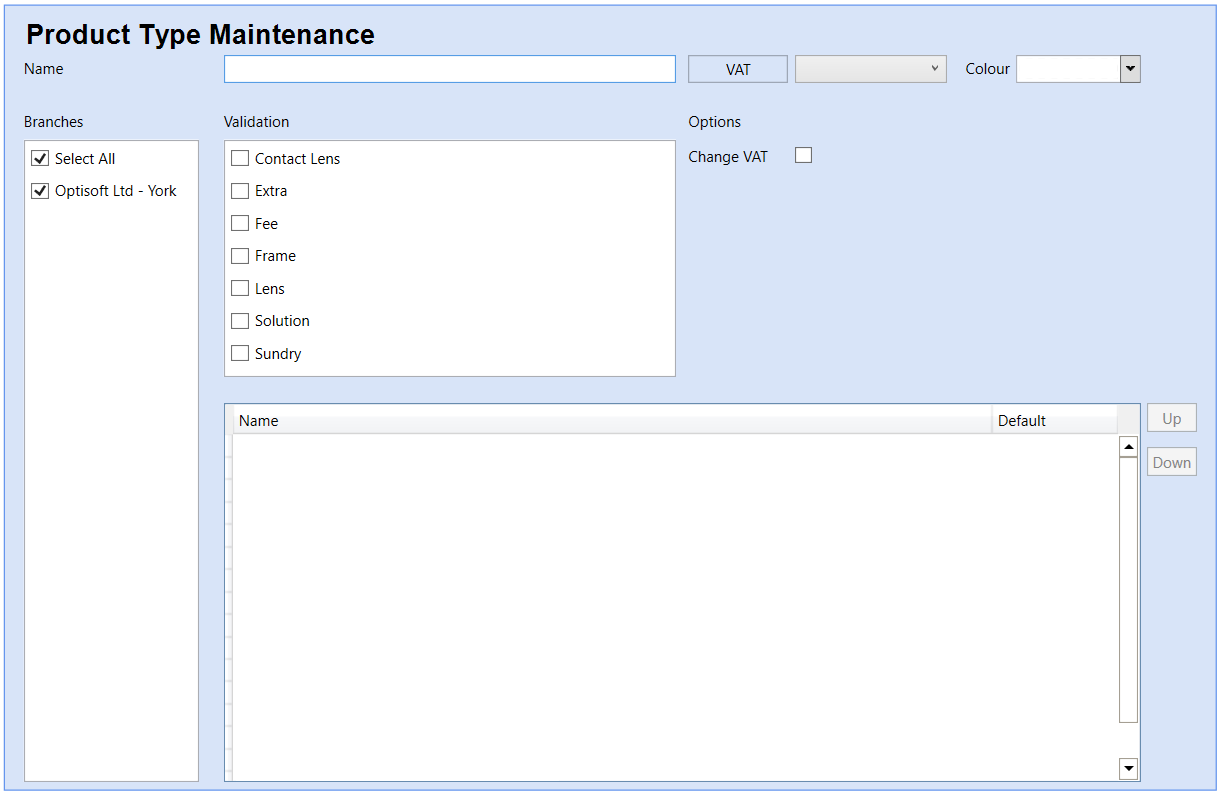
- Go to the Cash Module.
- Click the Maintenance tab in the toolbar.
- Click Type in the Product group.
- Enter a Product Type Name.
- Select a VAT type.
- Choose a colour.
- Select a validation option.
- Click Save or use the Auto Save feature.
Creating Product Categories
To create a Product Category in the Cash Module, you need to do the following.
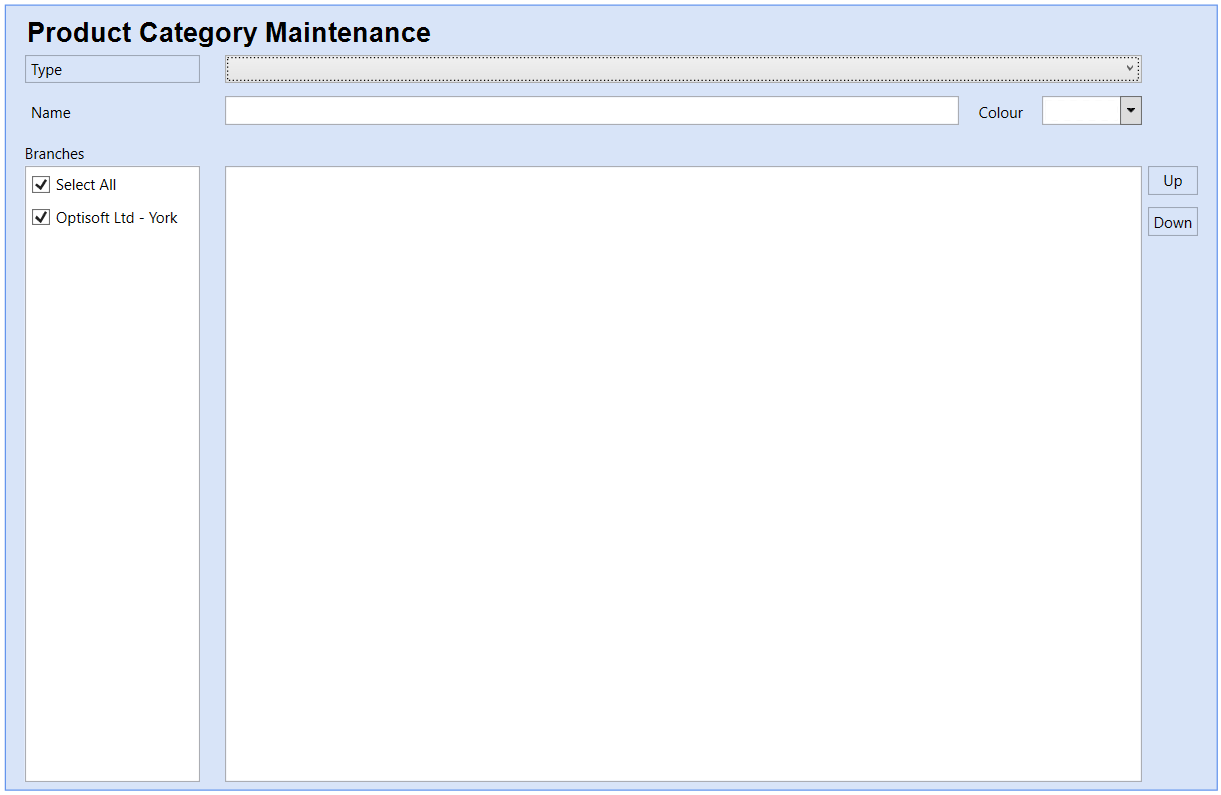
- Go to the Cash Module.
- Click the Maintenance tab in the toolbar.
- Click Category in the Product group.
- Choose a Product Type for your Category
- Enter a Product Category Name.
- Choose a colour.
- Click Save or use the Auto Save feature.
Creating Payment Types
To create a Payment Type in the Cash Module, you need to do the following.
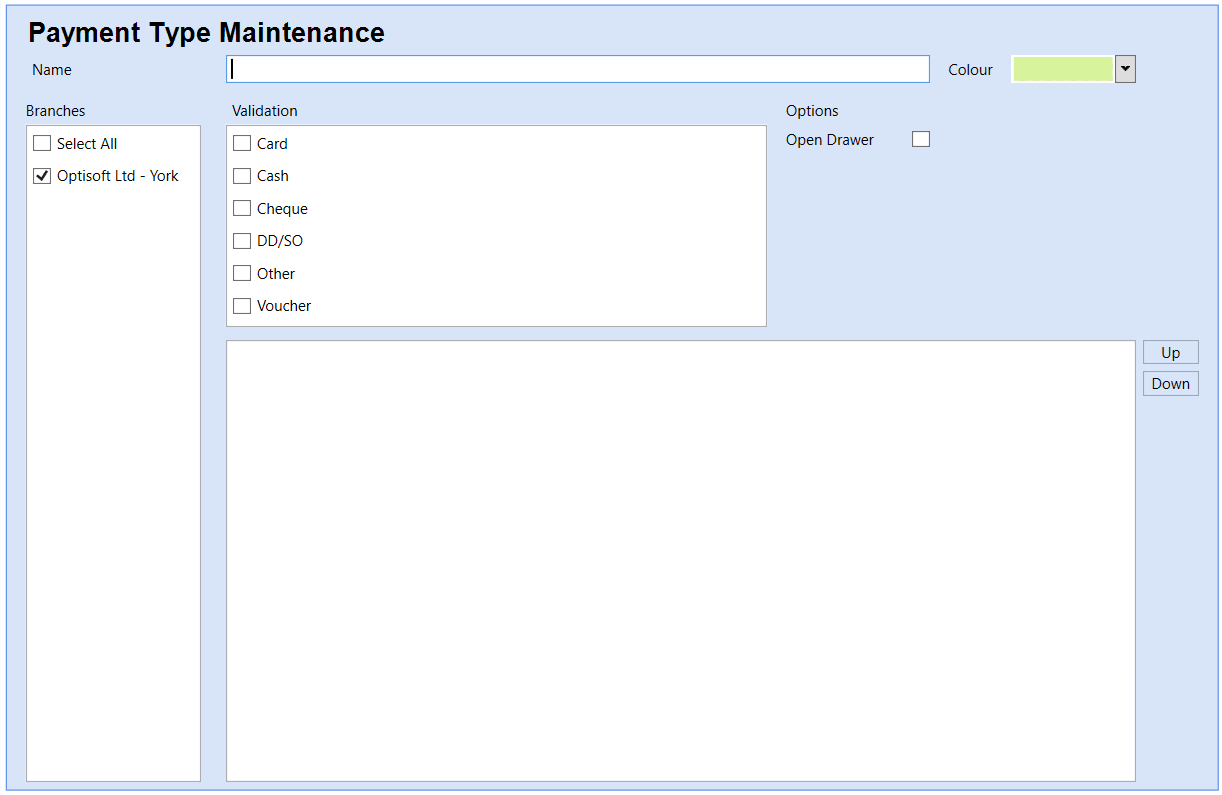
- Go to the Cash Module.
- Click the Maintenance tab in the toolbar.
- Click Type in the Payment group.
- Enter a Payment Type Name.
- Choose a colour.
- Select a validation option.
- Select the appropriate choices from the Options list.
- Open Drawer - Will open the till drawer when this Payment Type is used in a transaction.
- Click Save or use the Auto Save feature.
Creating Payment Categories
To create a Payment Category in the Cash Module, you need to do the following.
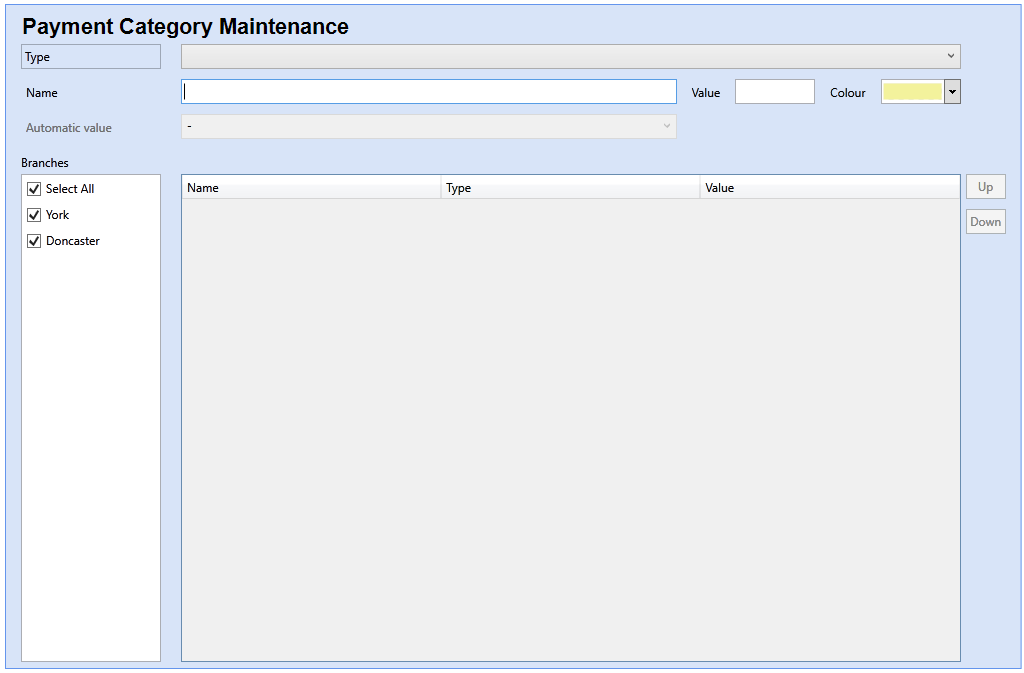
- Go to the Cash Module.
- Click the Maintenance tab in the toolbar.
- Click Category in the Payment group.
- Choose a Payment Type for your Category
- Enter a Payment Category Name.
- Enter a Value if necessary.
Instead of entering a value in the previous step, you could choose an Automatic Value in the next combo box. This value will be maintained by Optisoft and automatically update when value changes occur.
- Choose a colour.
- Click Save or use the Auto Save feature.
Creating a Receipt Template
Creating a Receipt Template is done through the Receipt Editor.
First you will need to go to the Templates Module, click New, select Type Cash and click Template Editor in the Toolbar.
To find you how to create your receipt template, click the link below.
Adding Adjustments
To create a Adjustment in the Cash Module, you need to do the following.
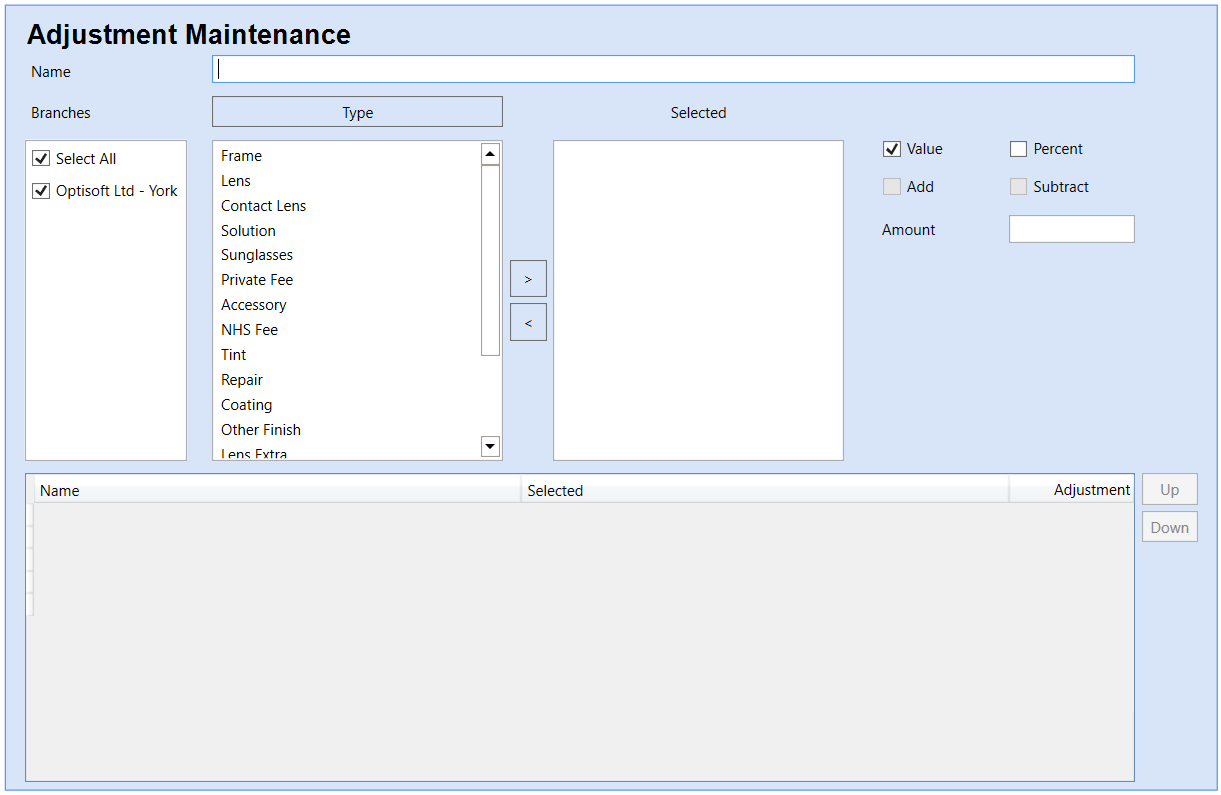
- Go to the Cash Module.
- Click the Maintenance tab in the toolbar.
- Click Adjustment in the Cash group.
- Enter a Adjustment Name.
- Double click, or use the arrow buttons, on each Product Type this Adjustment will effect. They will be added to the Selected list.
- Choose from a Value or Percent adjustment.
- Choose from Add or Subtract.
- Enter a relevant Amount.
- Click Save or use the Auto Save feature.
Creating Petty Cash Categories
To create a Petty Cash Category in the Cash Module, you need to do the following.
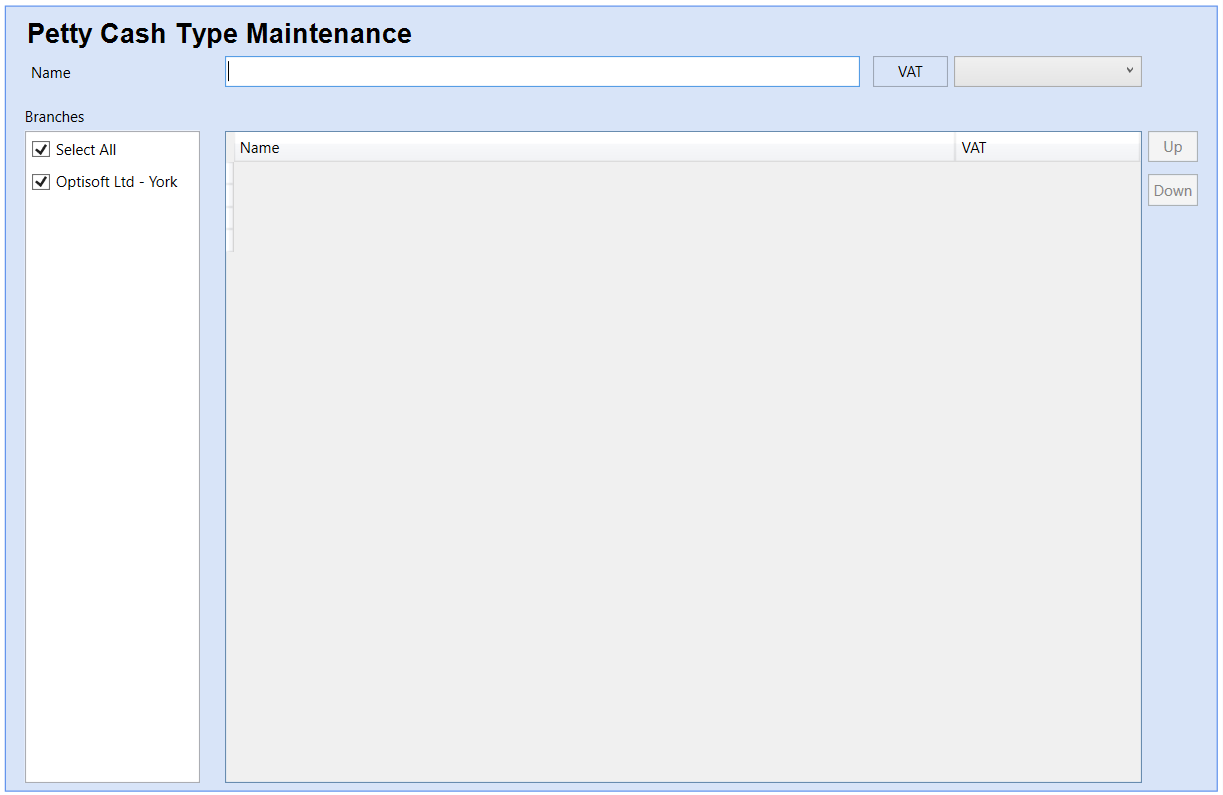
- Go to the Cash Module.
- Click the Maintenance tab in the toolbar.
- Click Petty Cash in the Cash group.
- Enter a Petty Cash Category Name.
- Select a VAT type.
- Click Save or use the Auto Save feature.